Skip to Content Skip to Search Go to Top Navigation Go to Side Menu


Archive for May, 2015


Harp of Pythagoras


Saturday, May 30, 2015

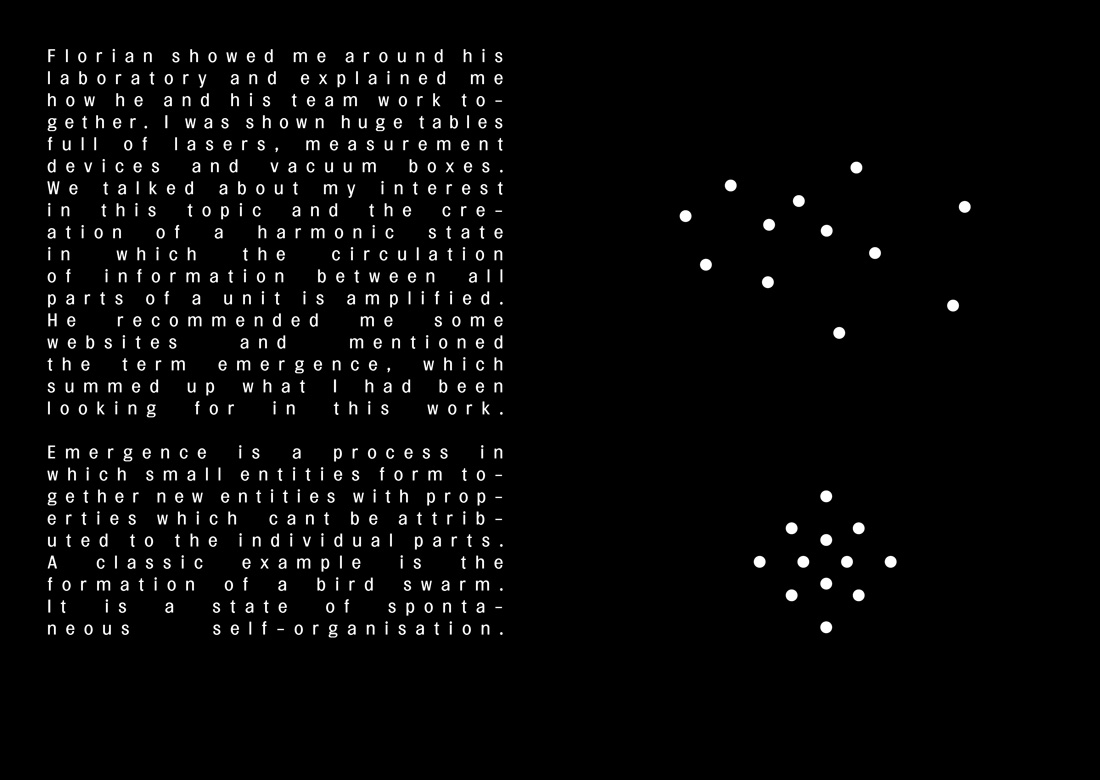
Why are things the way they are? That is a question I can never stop asking. Every day I find myself completely fascinated by things that other people seem to take for granted. I just cannot get used to the simple fact of existence.

One of my most recent questions: “Why do we always tune our instruments the same way?”  This is the question that sparked a whole design research of which the outcome was to be a mathematical music instrument.

At the start of my research, I decided to visit my old piano teacher. I asked if he had some time to think with me on the subject of musical tuning. When I met up with him though, it was quite evident that he was not a music theoretician. He did encourage me to find out by myself, so I headed his advice and did a lot of research.

The science behind the instrument: Pythagorean music theory

0501_gaffurio_pythagoras

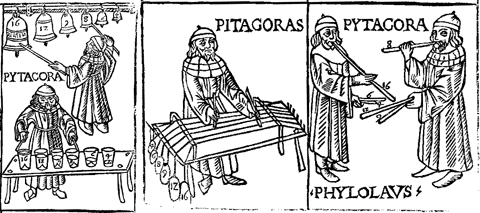
When starting this project, I did not expect to develop such a great fascination for a man who has been dead for over 2500 years and would probably cringe at the mere thought of modern music. Pythagoras had some very interesting theories about harmony. He believed people could be healed spiritually by listening to harmonious tones. He developed a tuning system based on exact mathematical ratios to create perfect harmony. He used the most harmonious interval (3:2) the perfect fifth as his foundation.

Sound file: perfect fifth

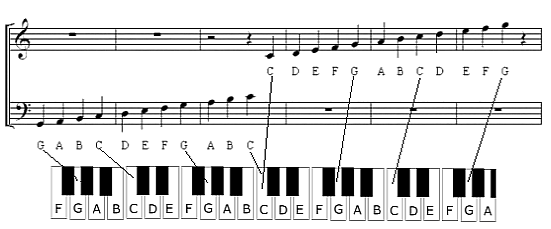
[audio:https://designblog.rietveldacademie.nl/wp-content/uploads/2015/05/perfect-fifth.mp3|titles=perfect fifth]

By stacking fifths upon fifths he developed a 12 tone system. The framework of our modern 12 tone system called “equal temperament”.

mtp01

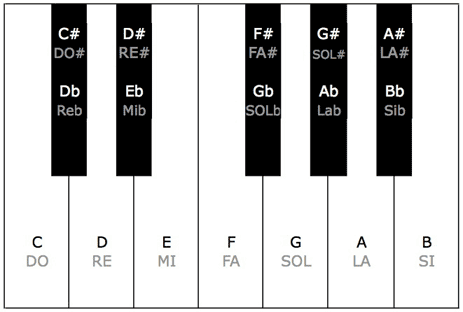
The 12 different tones in an octave as shown on a piano keyboard.


Mathematically Pythagorean tuning is perfect. It describes the almost exponential nature of sound exactly. This way he could play the musical equivalent of the golden spiral. Pythagoras saw truth in these harmonies. It was his way of communicating with the heavens.

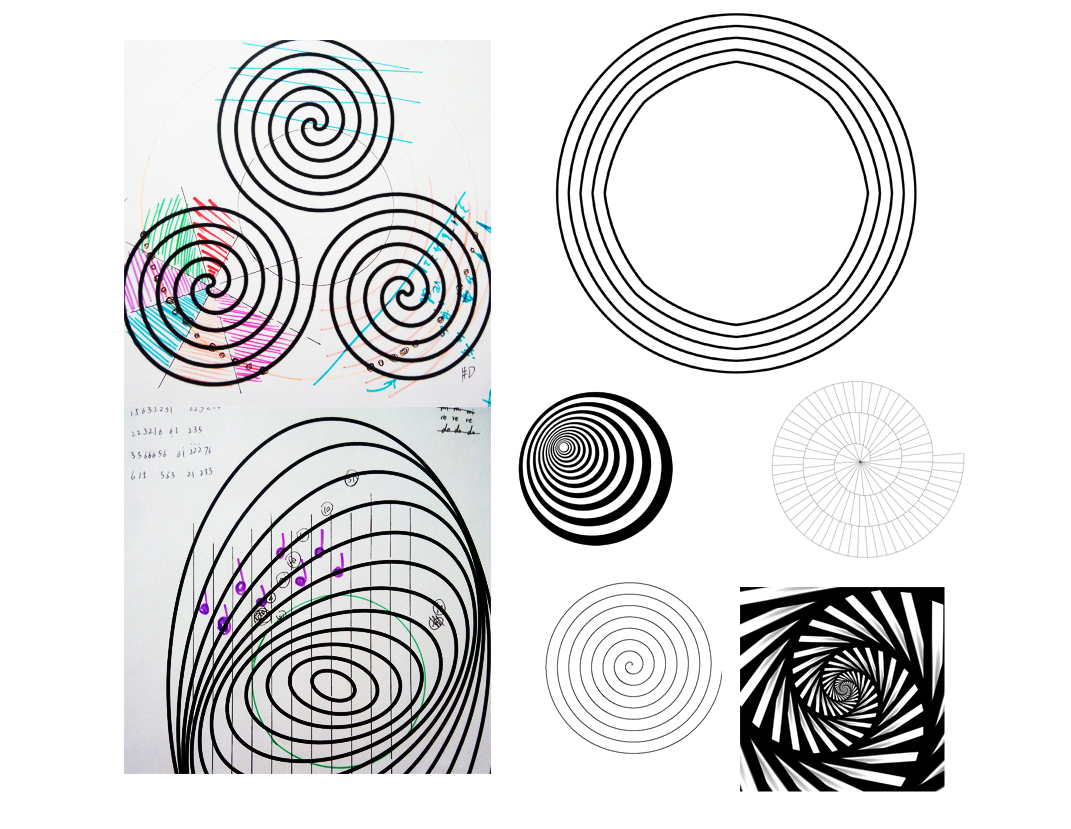
The most fundamental difference between Pythagorean temperament and equal temperament is the difference between a circle and a spiral.

 41-43spiral

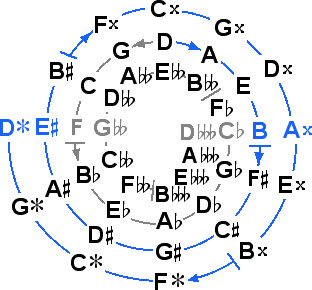
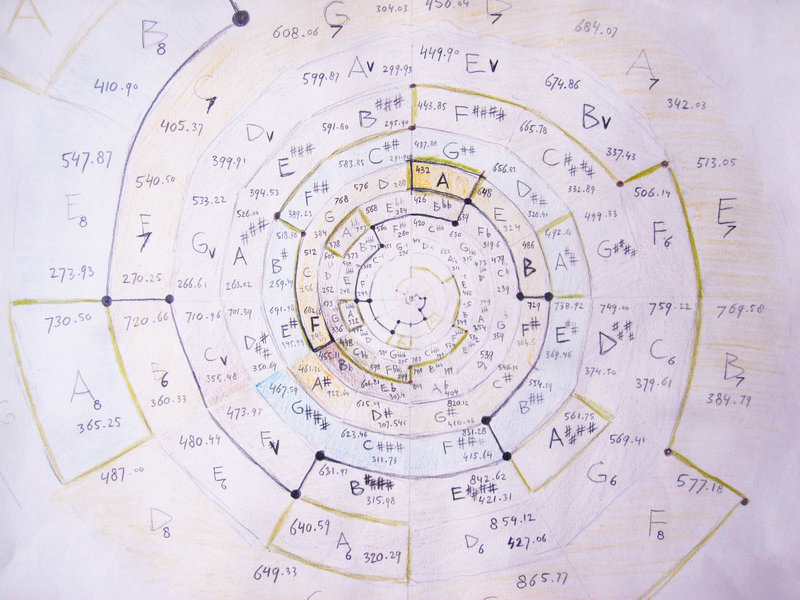
Pythagorean tuning shows the golden spiral of fifths. Because the spiral of fifths is a spiral shaped system based on stacked fifths, the fifth intervals are in perfect unison, but the octaves are in dissonance.

Sound file: wolftone

[audio:https://designblog.rietveldacademie.nl/wp-content/uploads/2015/05/wolftone.mp3|titles=wolftone]

This dissonance is also called a “wolf tone” because it resembles the howl of a wolf.

The wolf tone, is by no means the result of a faulty calculation. It does however create a problem for music playing. This problem is referred to as the Pythagorean comma. A quite ironic name seeing as Pythagoras did not believe in decimal numbers. The Pythagorean comma actually prevents you from playing more notes than the range of an octave because the 13th note will be slightly out of tune (though you could play perfect fifths into infinity). Pythagoras had a solution. He just did away with note 13 and upwards!

circle

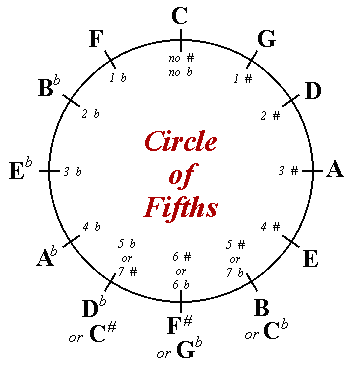
Equal temperament avoided the problem caused by the Pythagoras comma, by converting the spiral into a circle. The comma is still there, only spread out between all the notes. Everything sounds kind of okay, because everything is out of tune in the exact same way except for the perfect octaves (which you can play into infinity). Now we can play music in every key, but there is little harmony left.

Can the comma be solved? No. It cannot be solved because it is a fact of nature. Perfect octaves and perfect fifths cannot co-exist. No power of 3:2 can ever be a power of 2:1. Pythagorean tuning sought to find truth and equal temperament standardised it for the sake of convenience.

I found this very interesting, I wanted to hear the perfect fifths, so I gave myself the task to design an instrument based entirely on Pythagorean tuning. Not only would it have to be tuned in the right way, I also wanted the design to reflect the tuning, so I could understand it better.

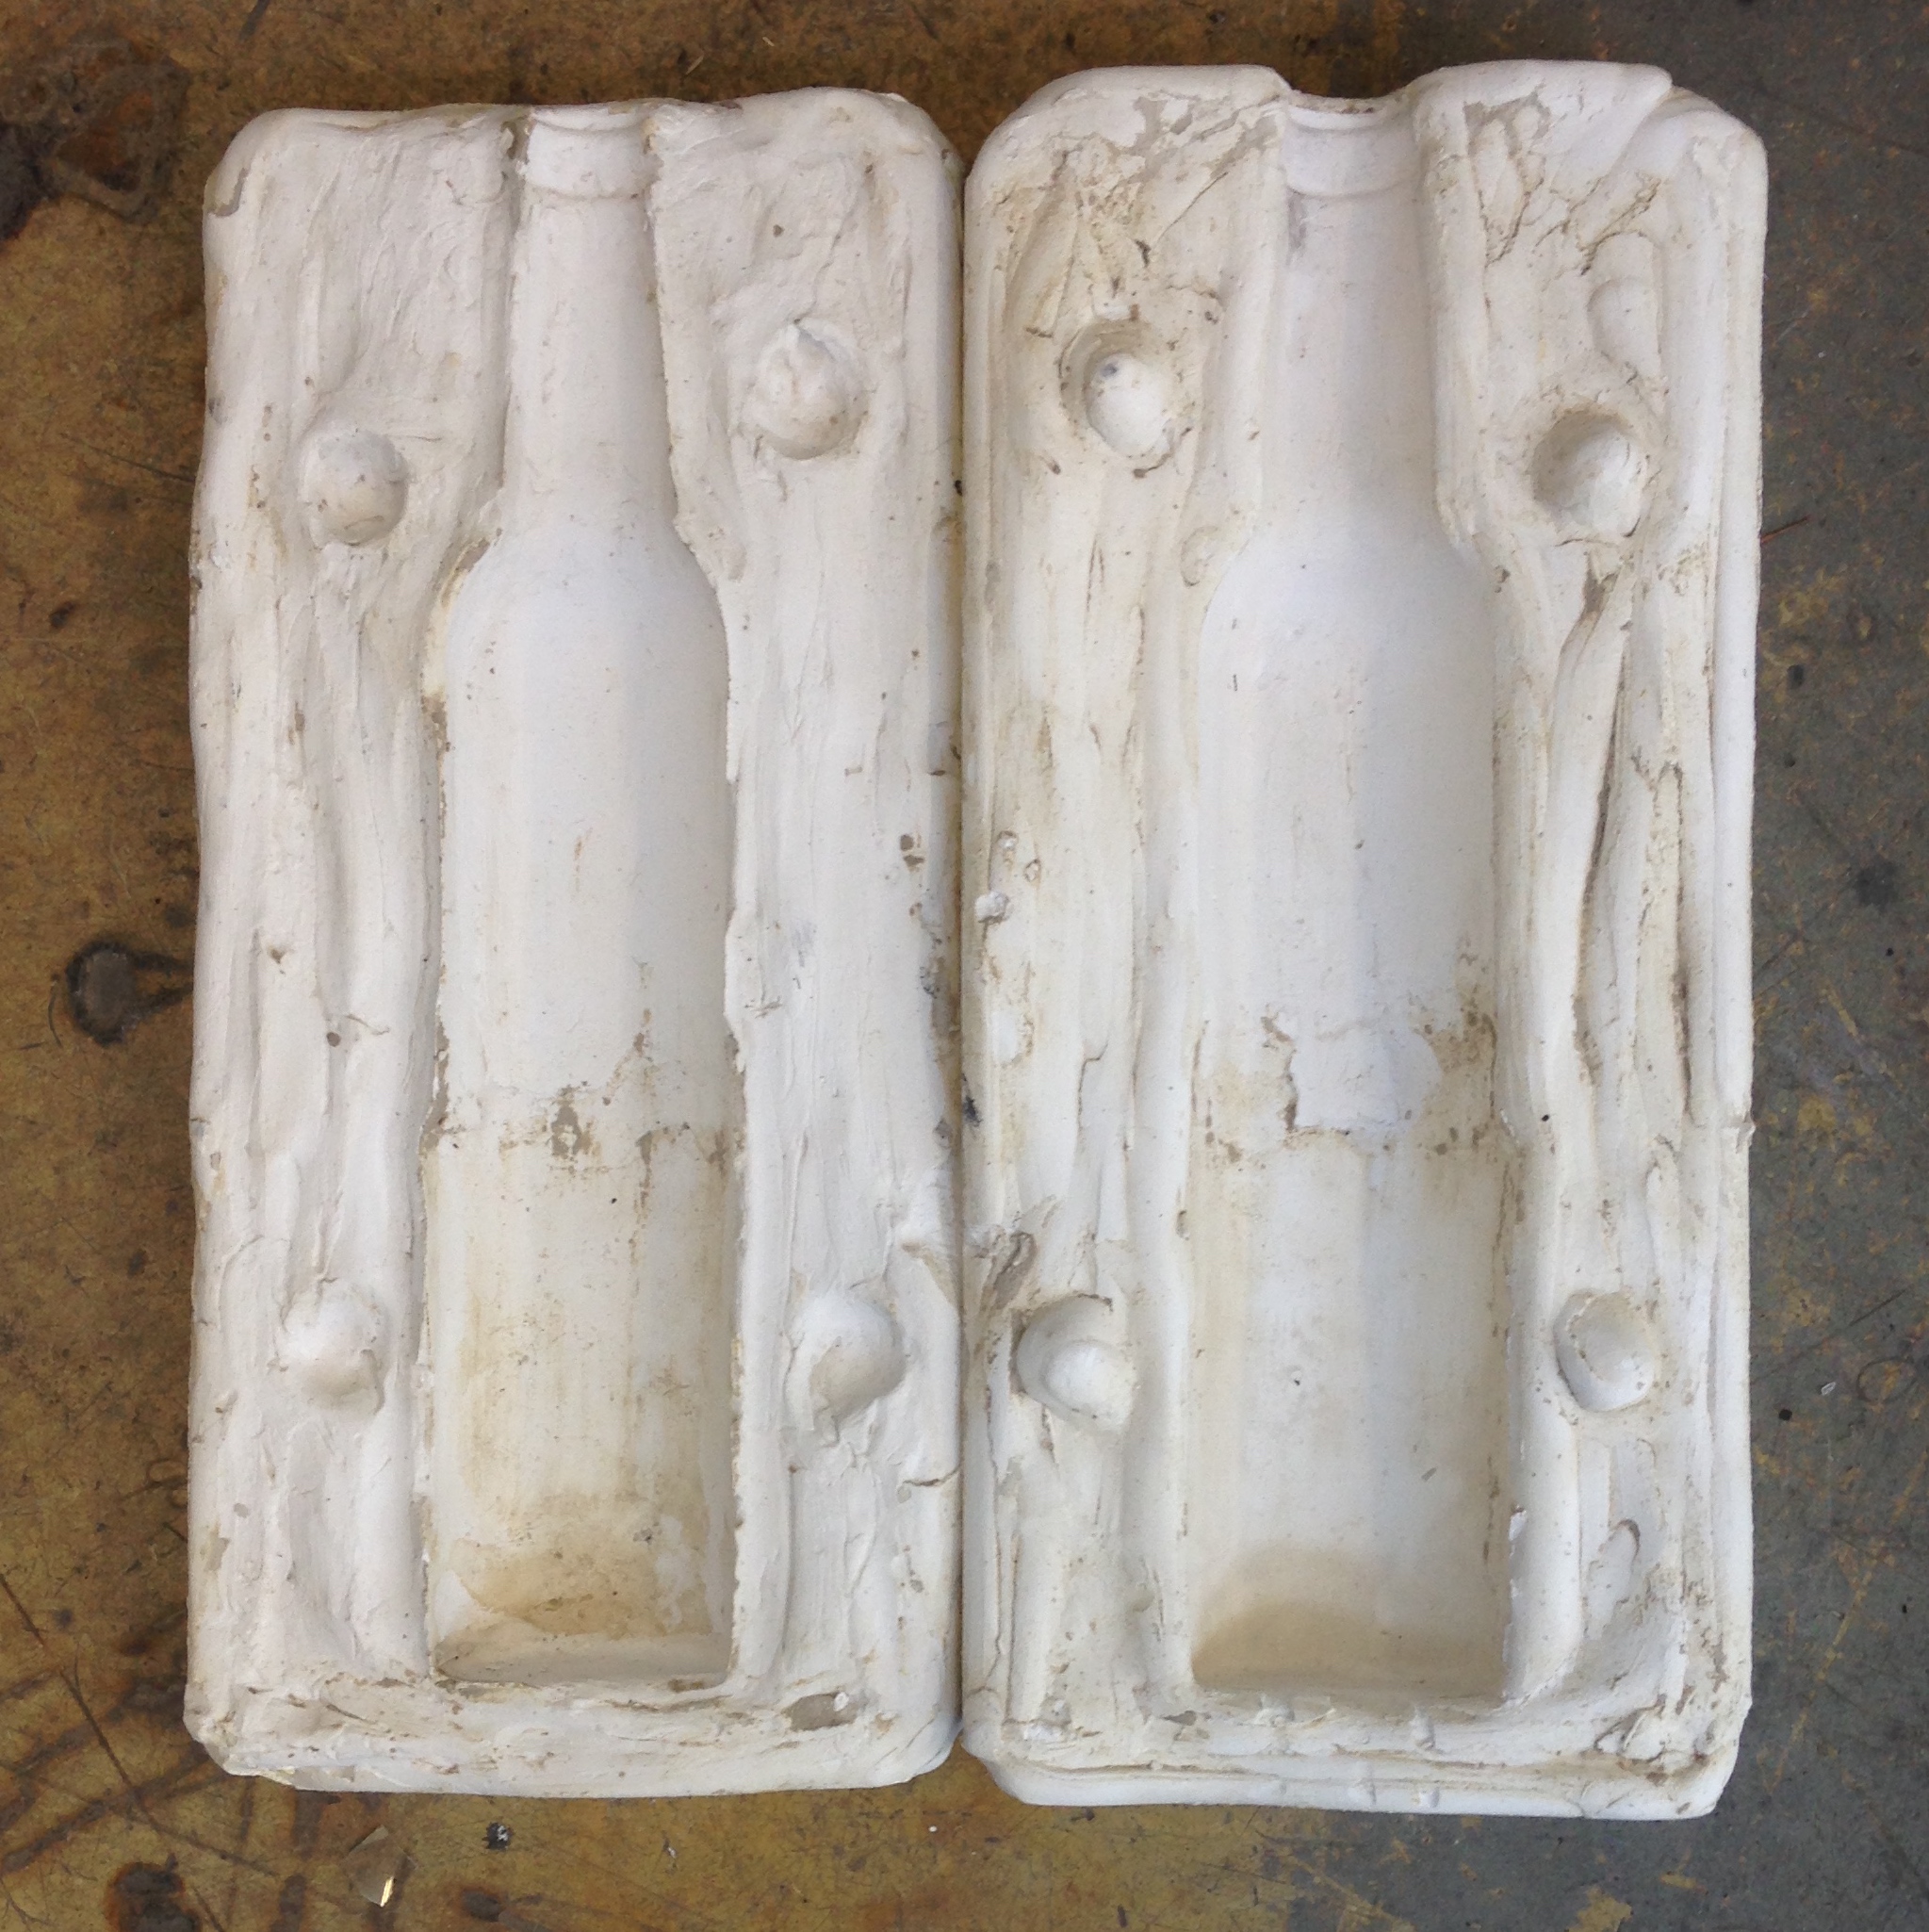
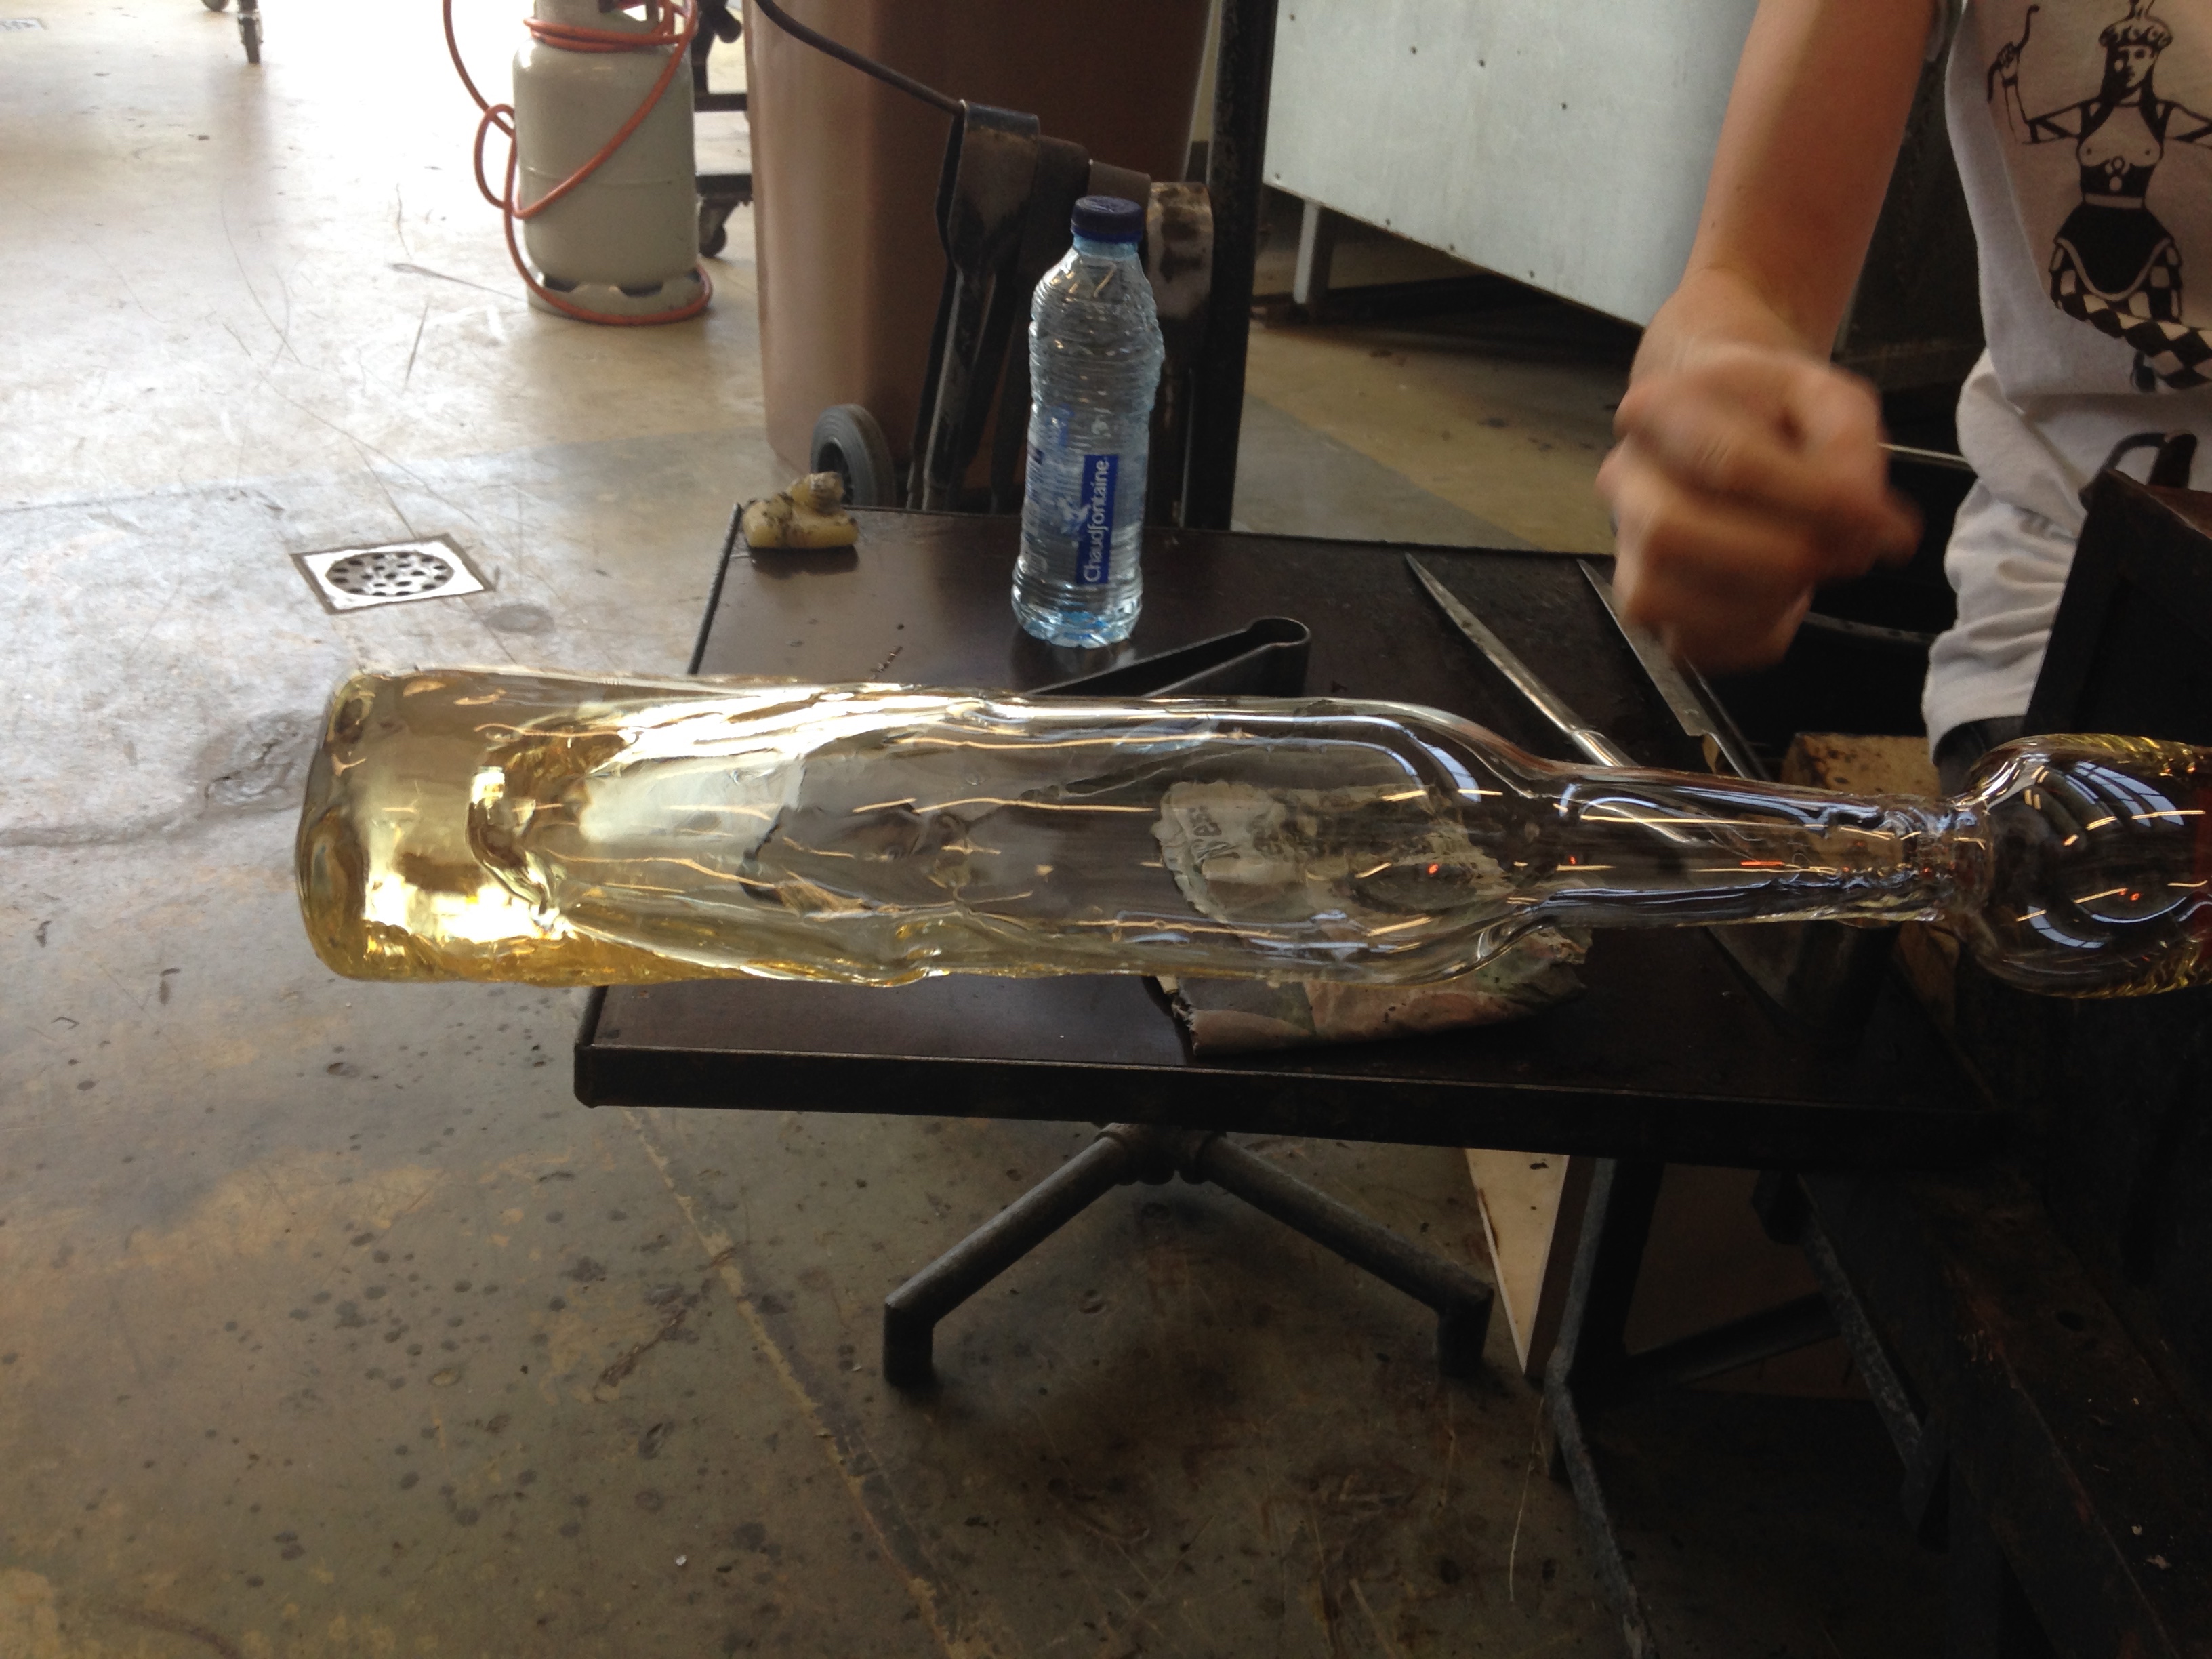
Creating the instrument

First I had to calculate the notes Pythagoras did not care about (note 13 and upwards), so I could make an instrument with more than 12 notes. That way I would be able to hear the perfect natural disharmony Pythagoras shied away from.

Luckily someone I know had already done the dirty work for me:

rsz_img_3861

Here is the chart I used to come up with the absolute frequencies of my instrument.

And here is the list of absolute frequencies:

rsz_scn_0006

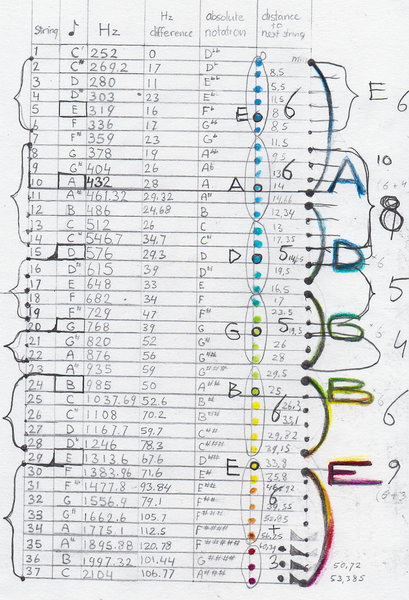
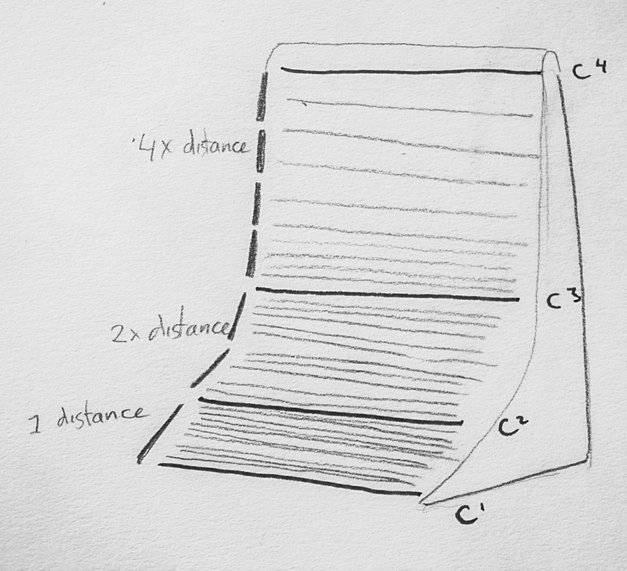
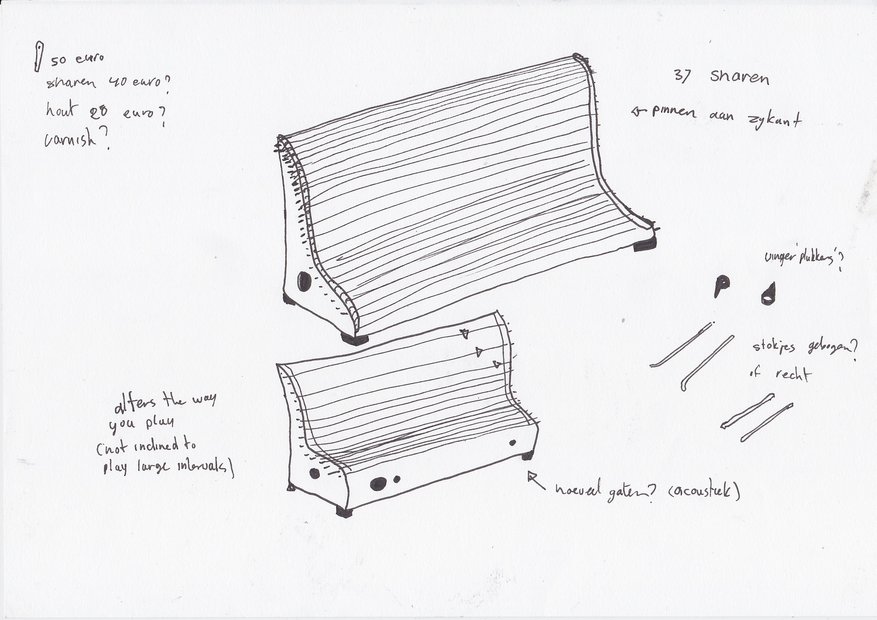
It has 37 strings from C1 to C4 where A2= 432 Hz.

Sound file: Pythagorean tuning of my instrument and equal temperament

[audio:https://designblog.rietveldacademie.nl/wp-content/uploads/2015/05/Pythagorean-tuining-and-equal-temperament.mp3|titles=Pythagorean tuining and equal temperament]

Sound file: dissonance between Pythagorean tuning equal temperament

[audio:https://designblog.rietveldacademie.nl/wp-content/uploads/2015/05/Dissonance-between-Pythagorean-tuining-and-equal-temperament.mp3|titles=Dissonance between Pythagorean tuining and equal temperament]

I was struggling to think of a meaningful design for the instrument. Out of nowhere it hit me

 rsz_1rsz_1scn_0003rsz_1rsz_scn_0005

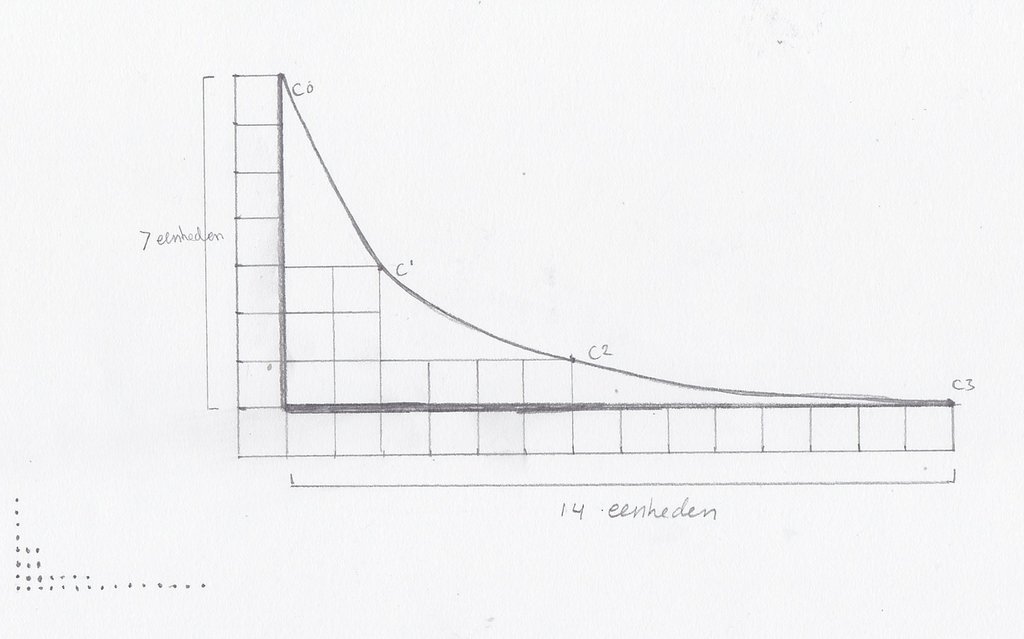
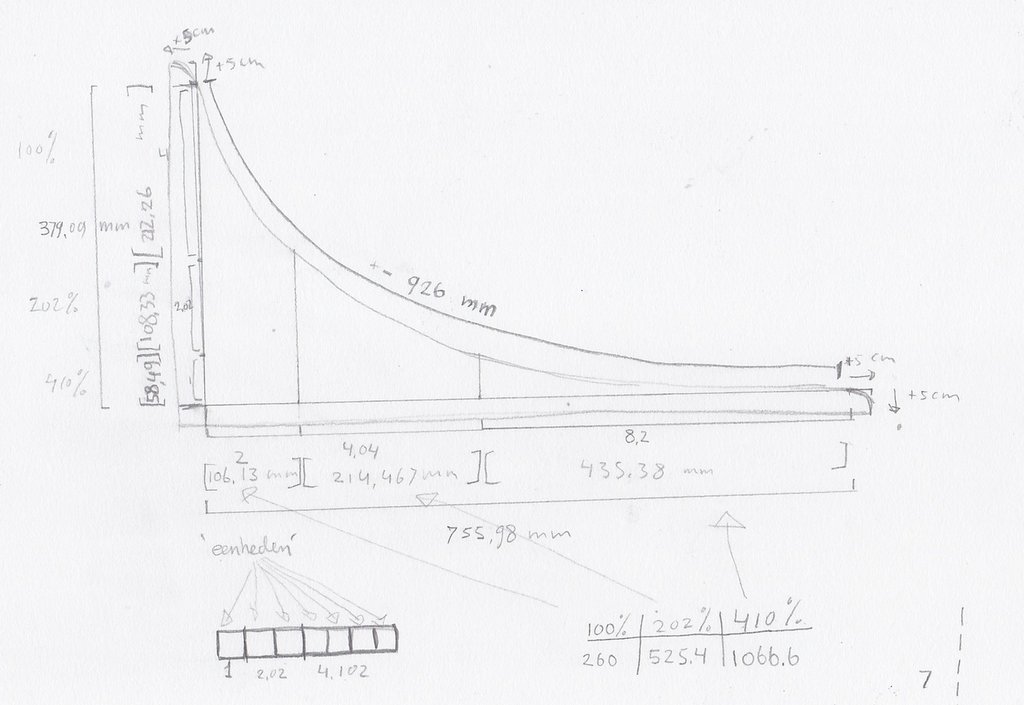
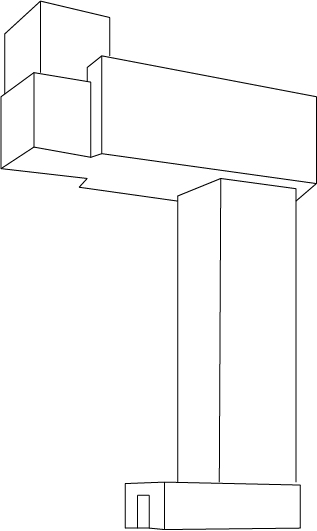
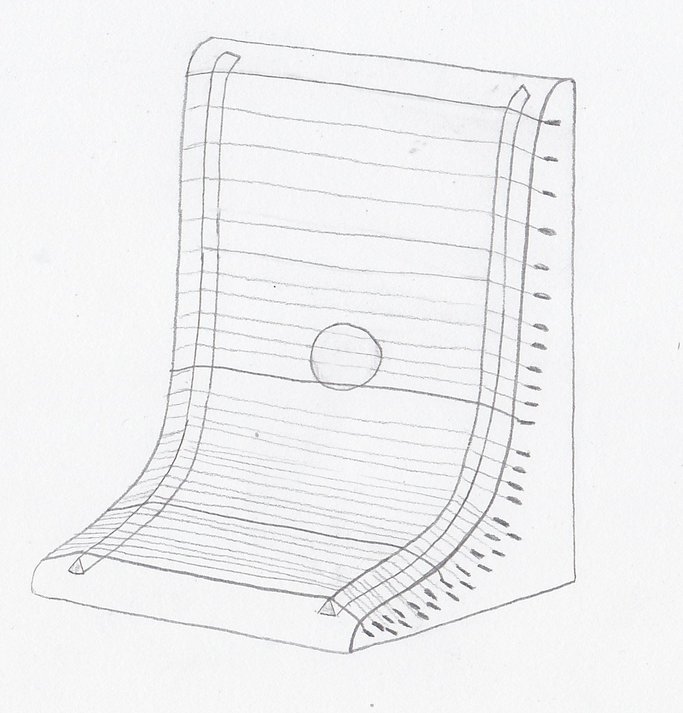
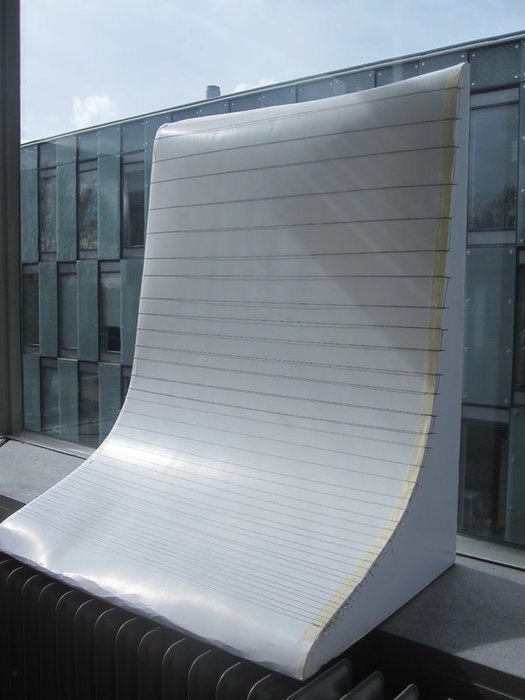
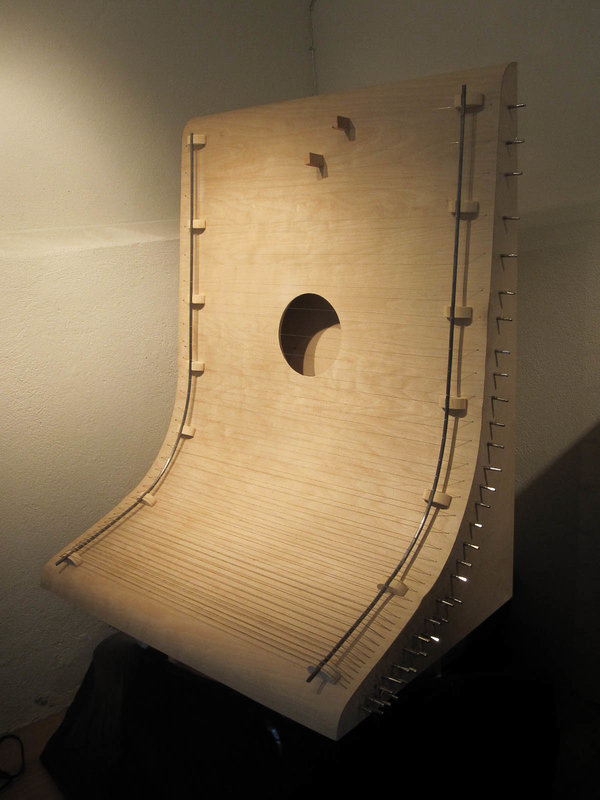
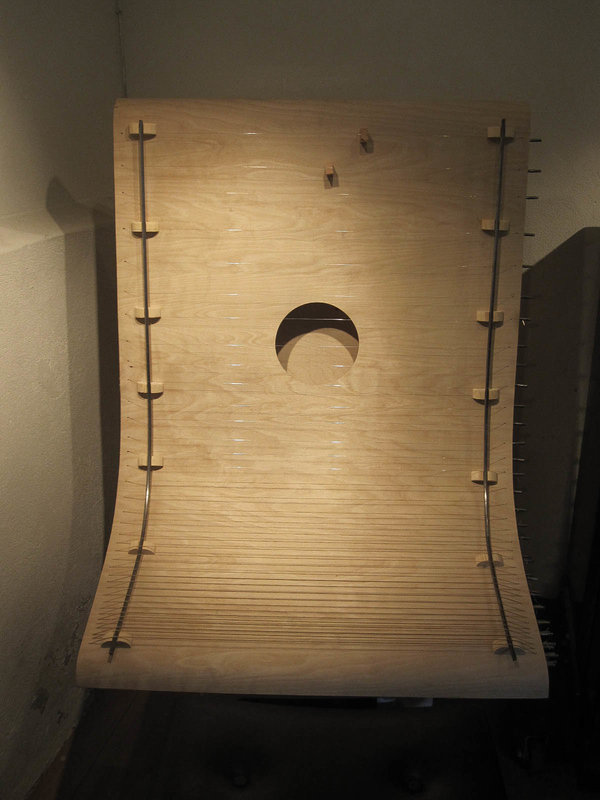
I drew the distribution of the frequencies of my instrument in these graphs and I realized the shape of the graph would be the perfect shape. It visualizes the exact near exponential nature of the tuning system. I even decided to place the strings at their corresponding spatial position on the instrument. From down to up, the strings grow increasingly farther apart from each other.

 rsz_img_3864 rsz_rsz_scn_0004-1 rsz_scn_0002


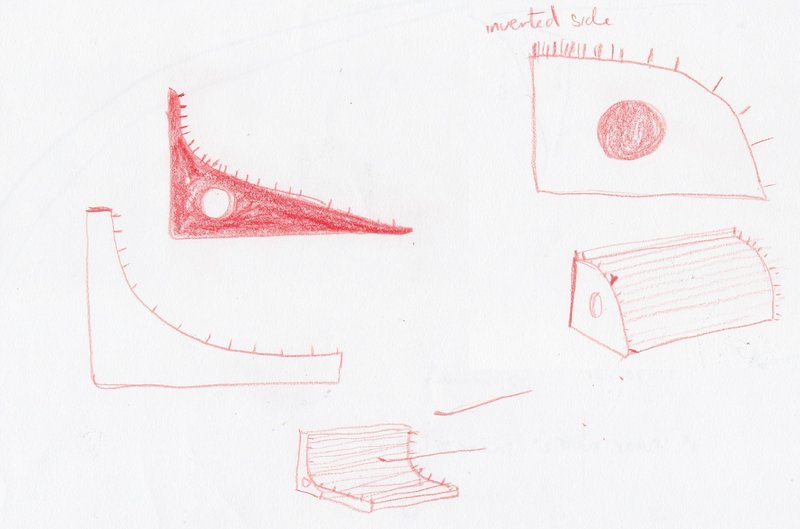
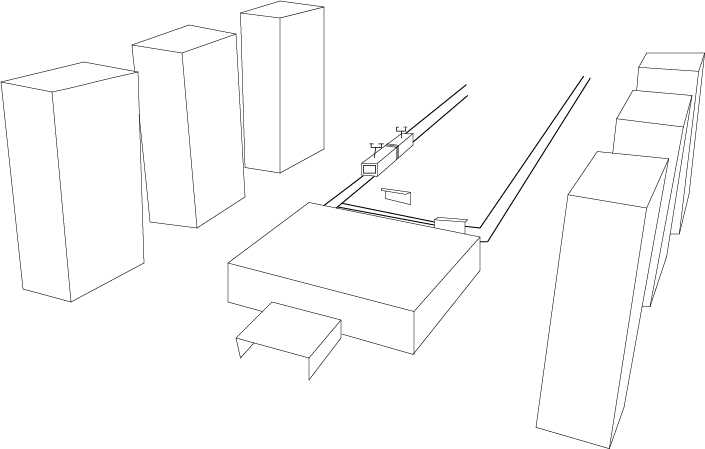
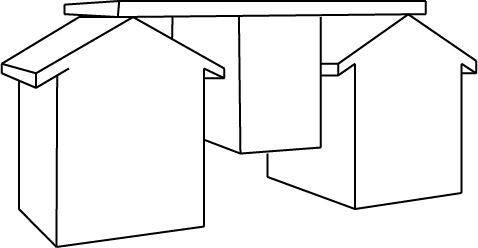
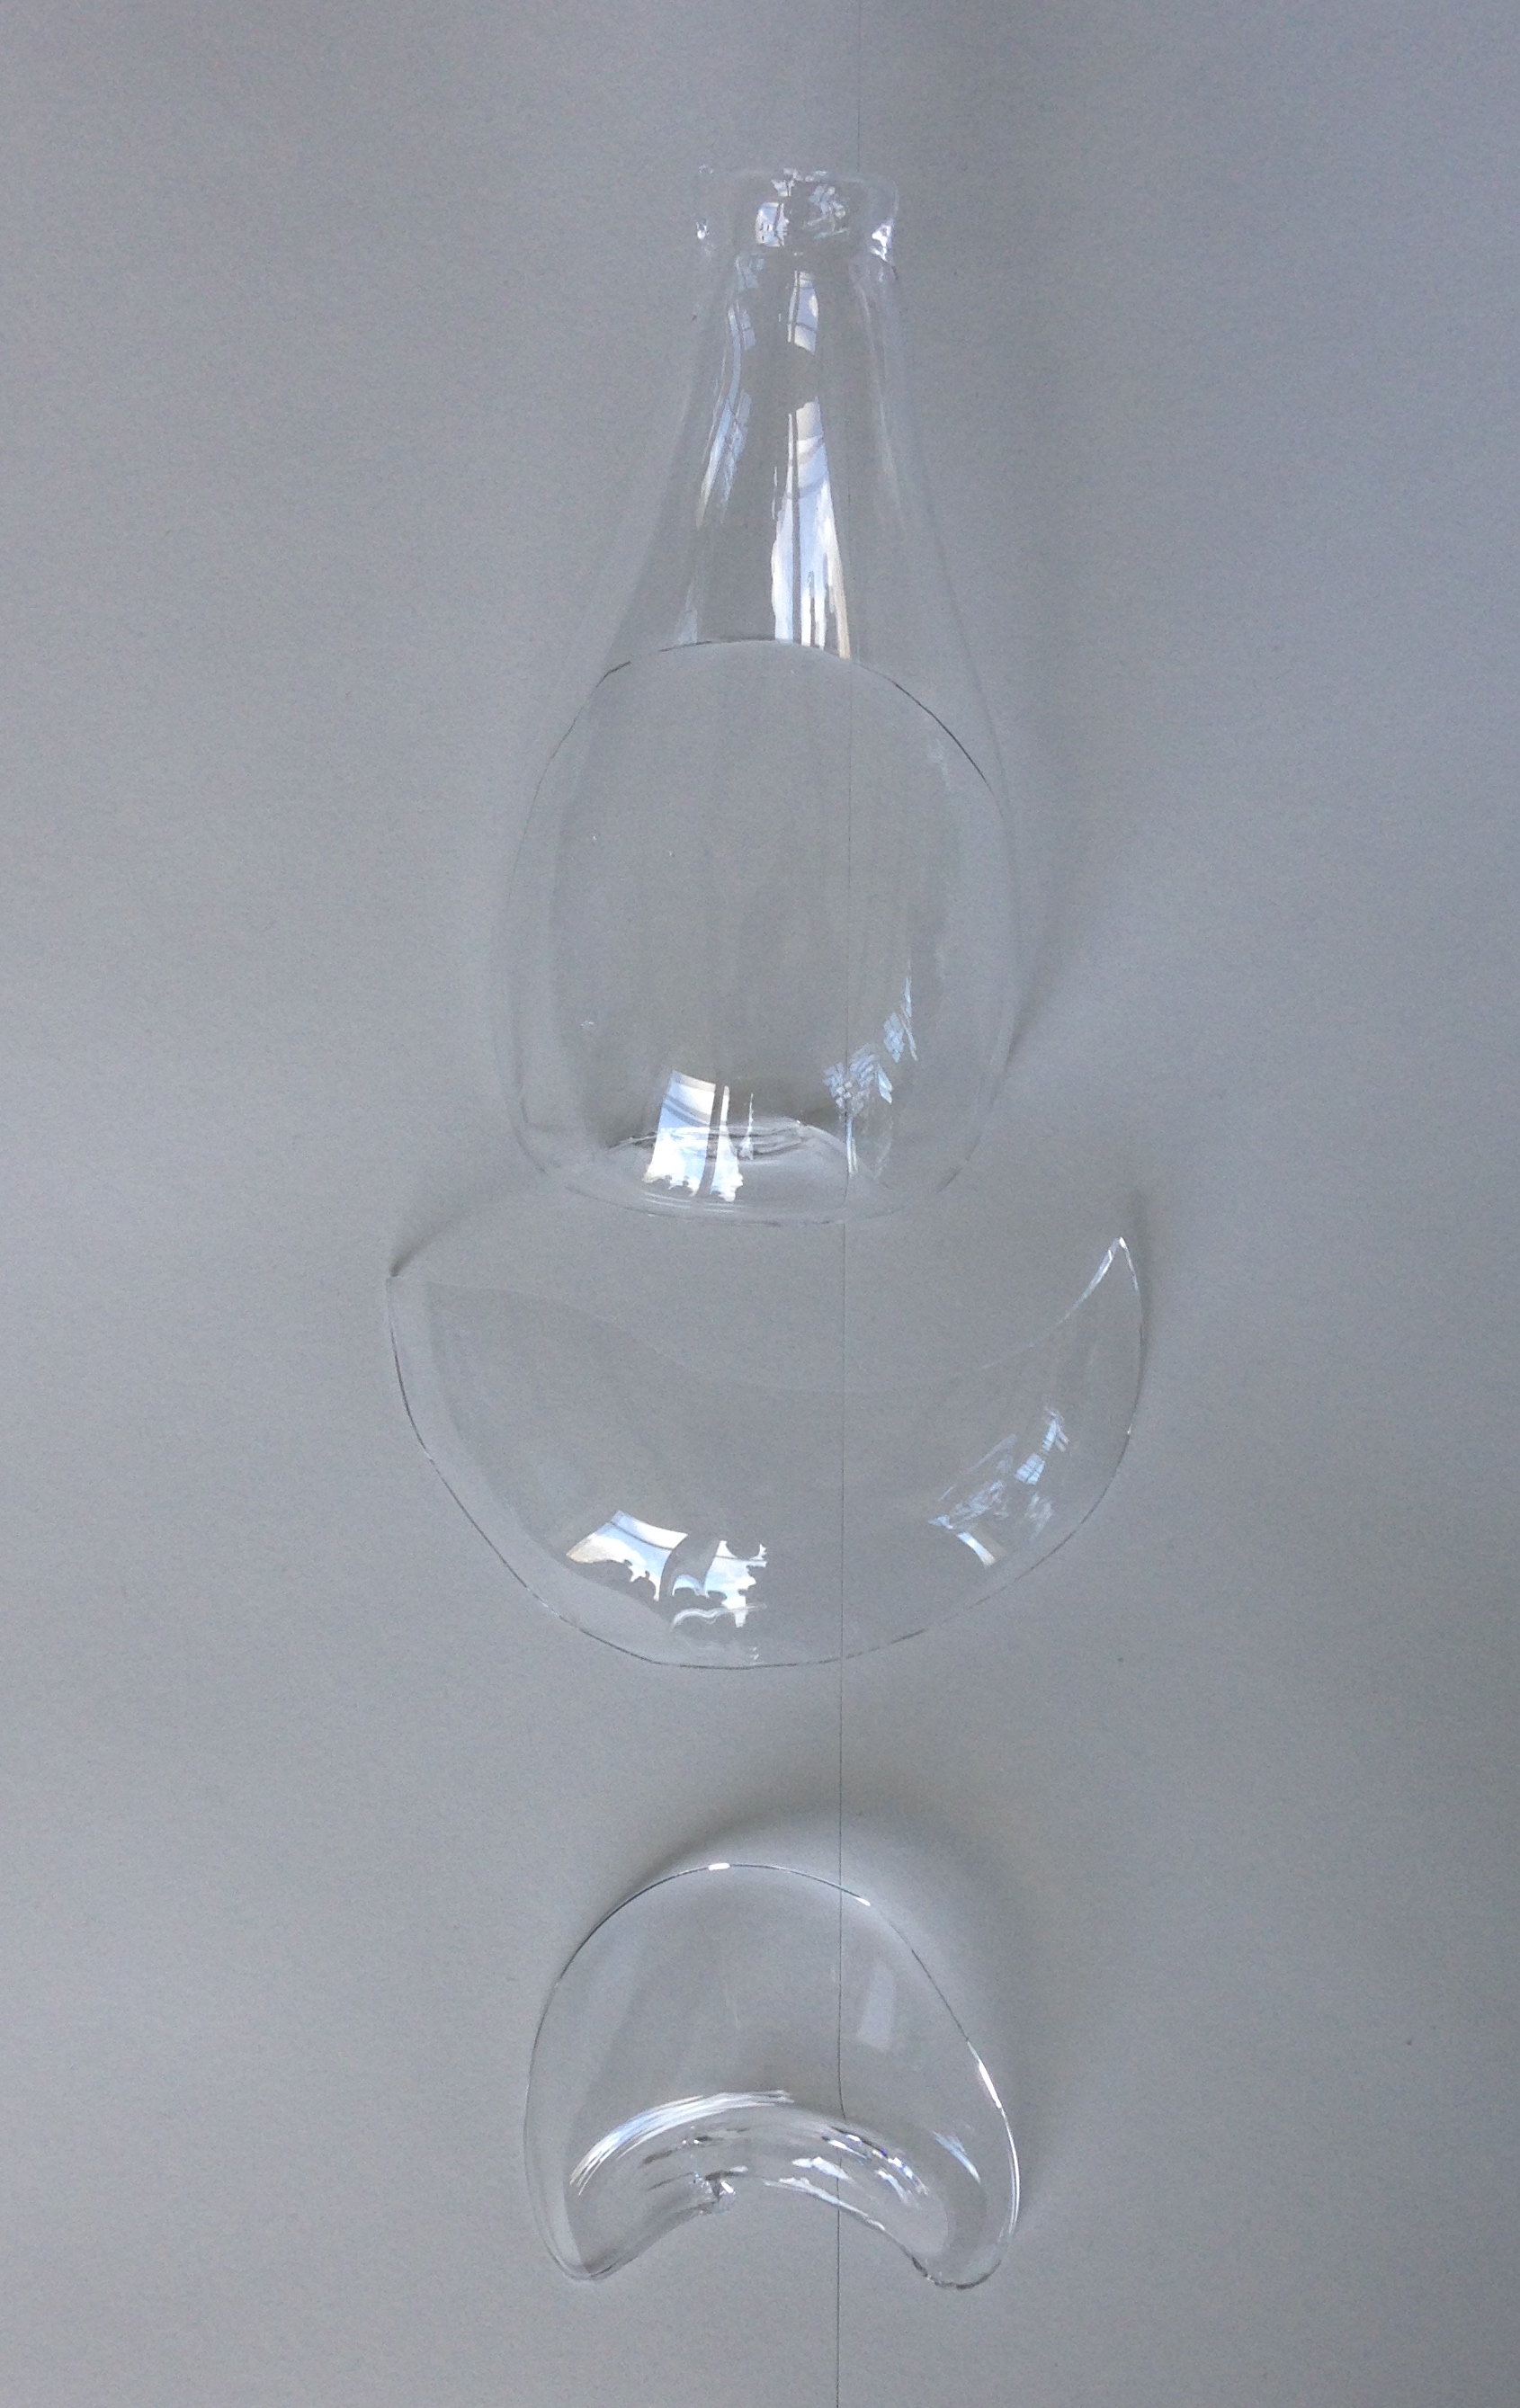
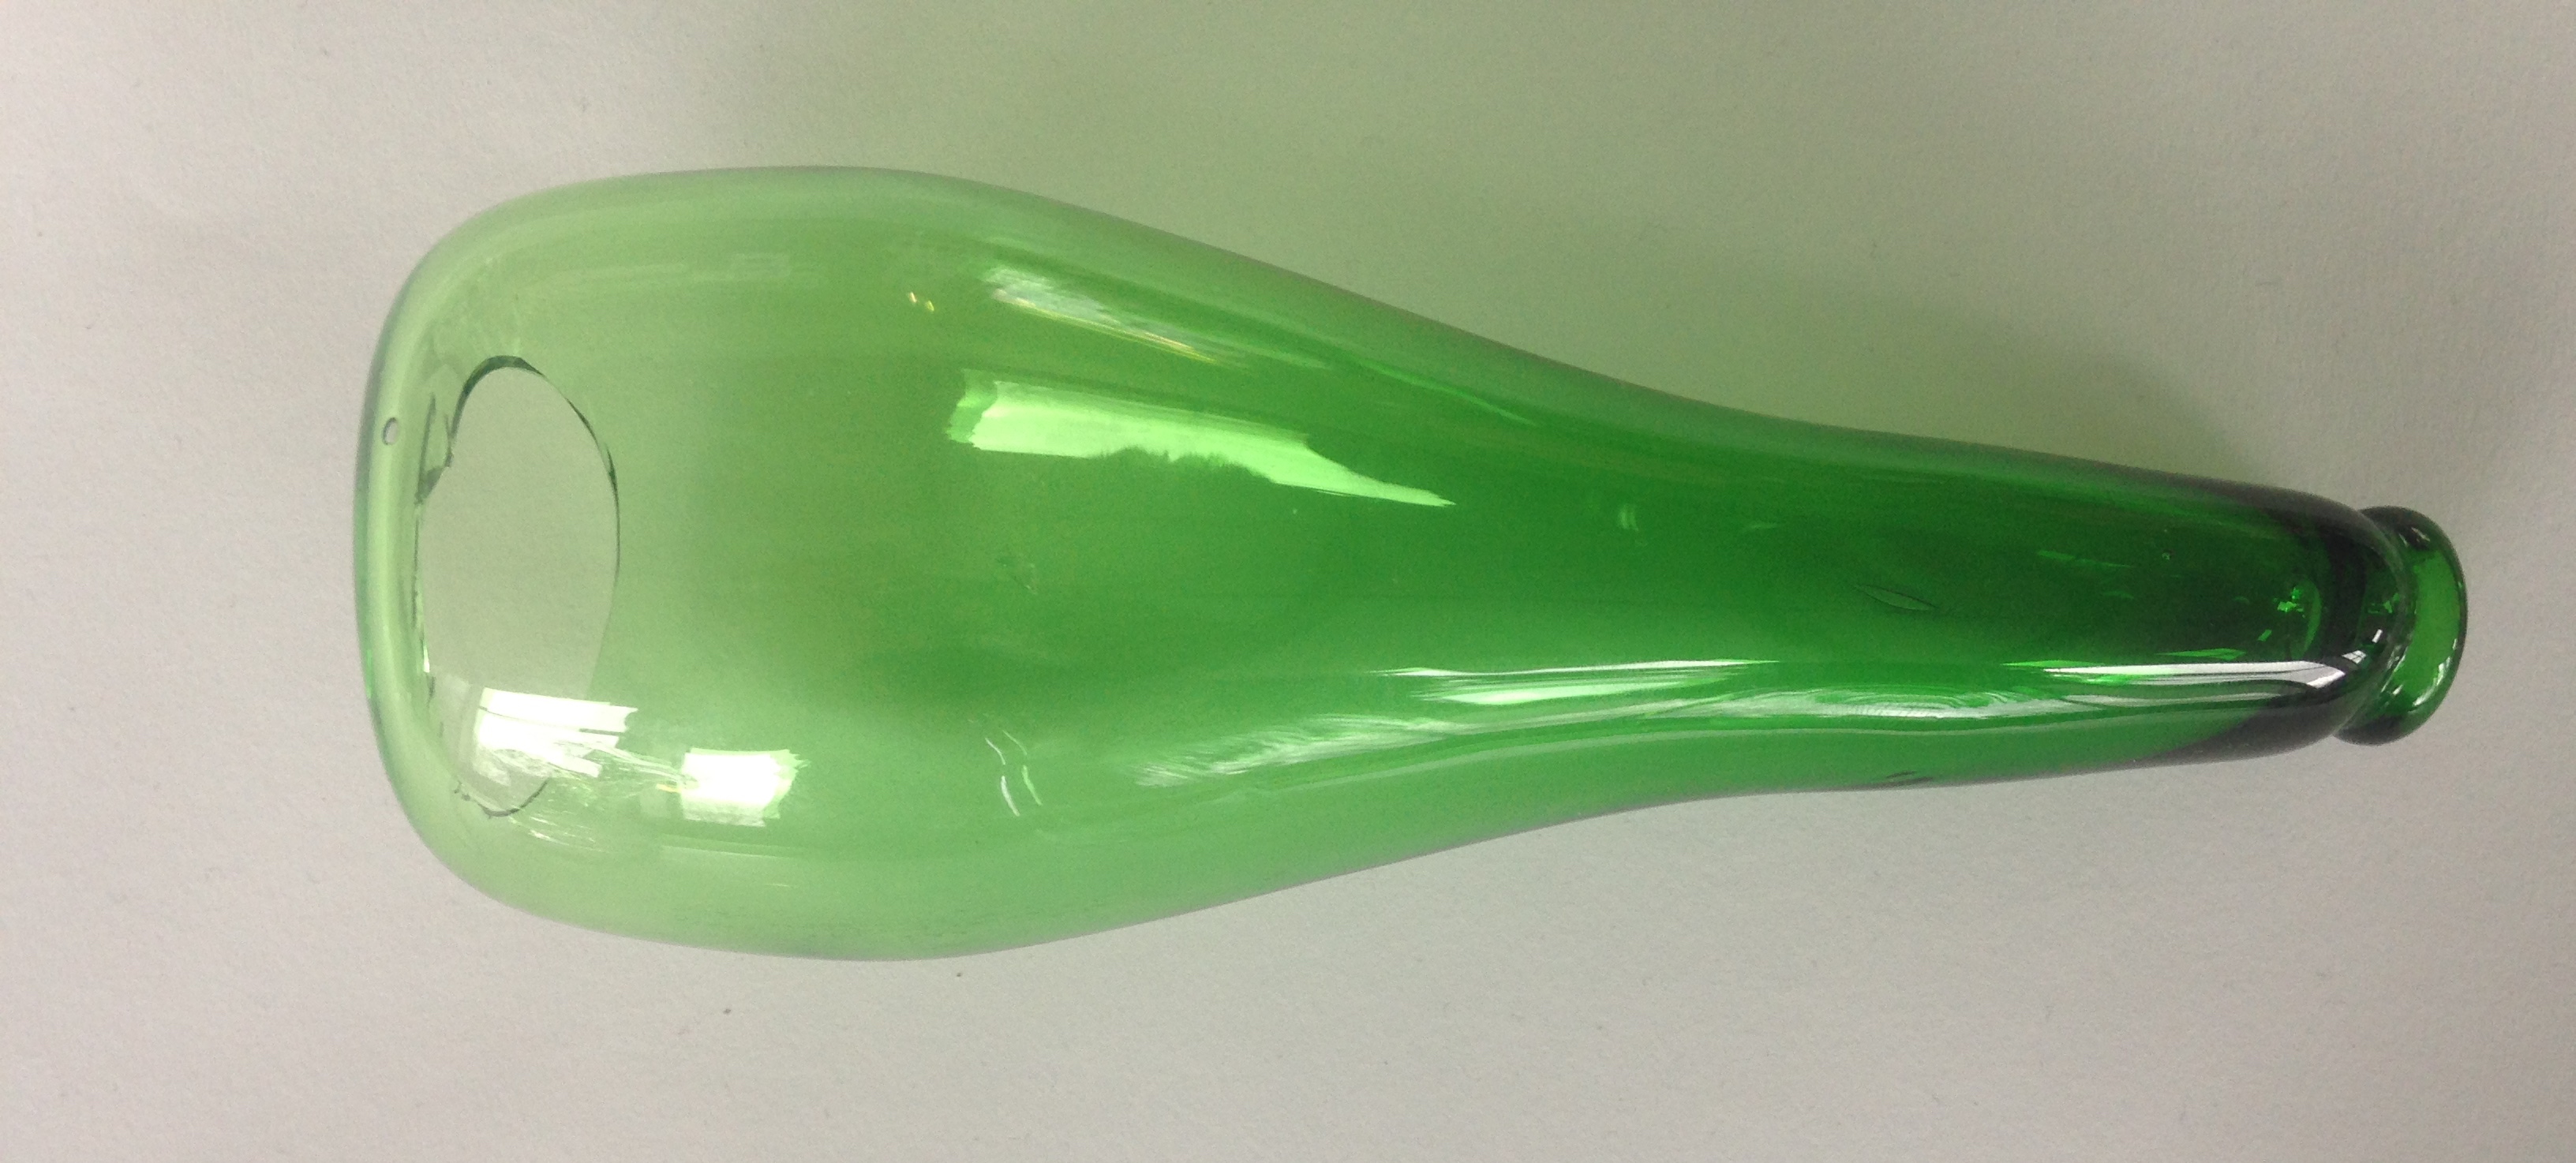
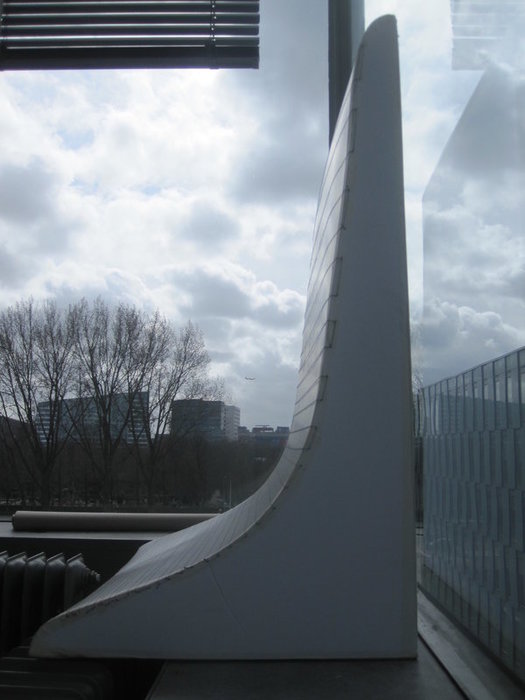
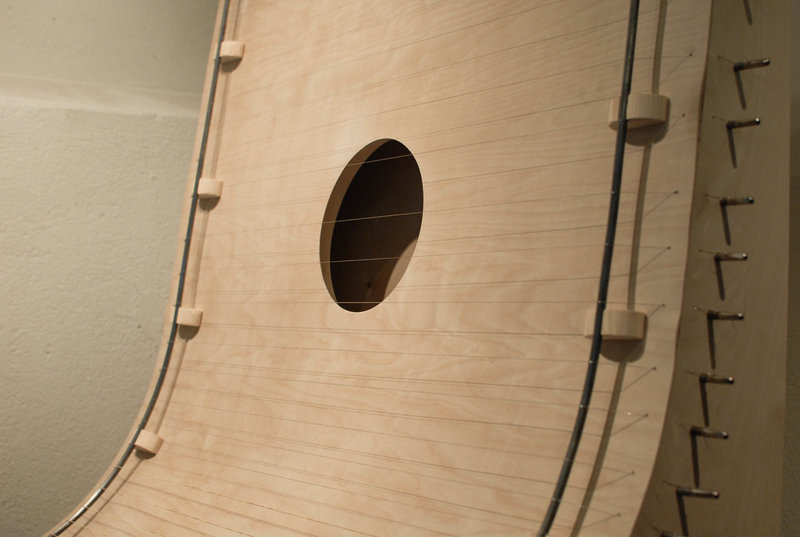
Final design and model

rsz_scn_0001 rsz_rsz_img_3410 rsz_1rsz_img_3409


Stages of building

rsz_img_3852 rsz_img_3854-2-1

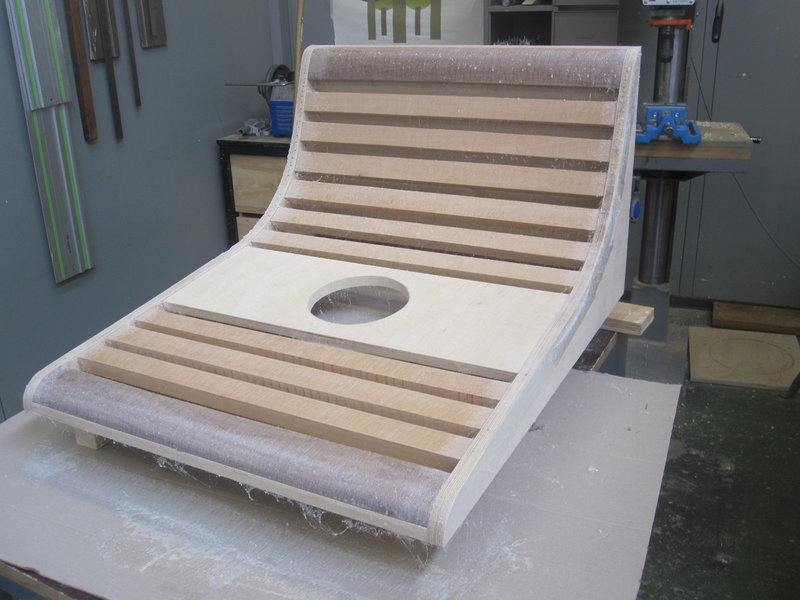
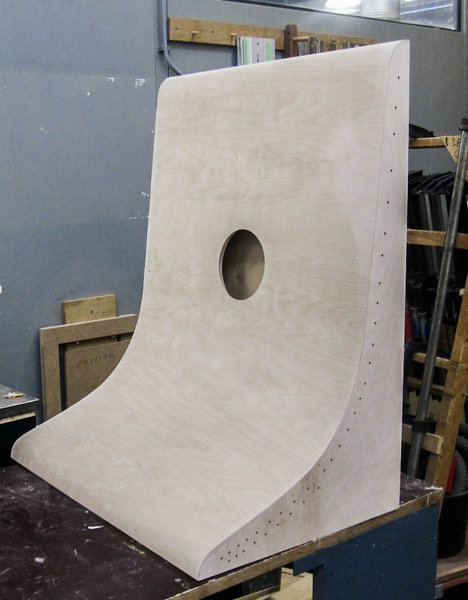
The instrument is made from birch plywood. The inside is reinforced with massive wood to resist the tension of the strings.

Final outcome

rsz_img_4414

                                                                                                         rsz_img_4412 rsz_ca2_0060


Sound file: some sounds of the instrument (not tuned to pythagoras)

[audio:https://designblog.rietveldacademie.nl/wp-content/uploads/2015/08/HARP-.mp3|titles= some sounds of the instrument]

Math is nothing other than stating things as they are. I only realised this during my research. It is the very foundation whereon math is based. It is the thing whereon my instrument is based. It shows tuning systems as they are. It does not hide the perceived disharmony. Creating this instrument has truly showed me how bad our attempts are at grasping the nature of reality. We are trying to create harmony with notes that actually form dissonance. It’s complexly ridiculous.

As an art student I say I made an interesting discovery. As a musician I say I have created an incredibly ridiculous instrument and I am very happy with that.


Package for Jewelry


Thursday, May 28, 2015

For the collaboration project I met Nadine Kieft, a young jewelry designer based in Amsterdam. I got in contact with her via her website. Her work looked fresh and trendy, not so traditional and a style that people would love to buy in these days. This was important for me because I was curious how she is working. How she is getting in contact with people and how she is organizing the sales of her work. Because her work looked so nice, I thought that she was a popular designer. I sent her an email and we made an appointment to meet for one hour or a little more. She told me that she was busy but that she could make a little free time for me.


mad3  mad2

In the beginning of my process I experimented with candle wax and plaster to make molds. It ended up as jewelry which is captured in materials, almost like fossils.


I met her on a Thursday in January. I visited her in her atelier in the East of Amsterdam. She had a really nice working space. Not super big but enough space for the small works she makes.

I got a nice cup of tea and from that moment we talked about her work and her life as a jewelry designer. She told me a lot about how she started and about her study. She studied at a Jewelry Crafts School in Amsterdam. She learned the craft there but later in her life she discovered that she did not got the appreciation for her work she deserved. It is super hard for her to get an exhibition space in a gallery for her jewelry simply because she did not study at an art academy. Because of that she is forced to sell her work via organized jewelry markets. These markets are quite expensive to join. To rent one stand on the market she had to pay around 1500 euro’s, what is quite a lot if you are just started with your own business.
Nadine told me about the rest of the organization she has to do for her business. It became clear for me that the part of organization, promotion, talks with customers, and website issues, is bigger than the part of designing and making jewelry. It is the bitter sweet truth about being an artist. It made me think. It made me think about the jewelry she makes, that the outside, the part that has the shiny stones and gold is not only the work but that there is much more inside one jewelry piece, namely all the organization around the piece.
I got an image in my head of a ball containing three layers. The ball is a symbol for the jewelry. The core of the ball is the concept, the personal part of the work. The layer around the core is the materialized work, for example the jewelry piece with gems and gold. The outside layer is the organization of the work. The promotion, the connections with people, all the things that are invisible to see but what is almost the most important part of the jewelry piece. The outside layer is invisible and visible in the same time. It leads the eye to the work. Without this layer it will be hard for the artist to sell the work and to make a living out of it.


mad6 mad1

The second step I made was working with layers and experimenting with different materials. I was inspired by the look of a traditional pearl necklace, using clay to make the beads by myself. The fossil slightly changed in a roughly made package. Still the material was not speaking to me as if it was a real package. 


My thinking process went on. How to make an “organization” for a jewelry piece? What is “organization” exactly and how to materialize it. These questions where constantly in my head. As always, I got stuck with all these problems, I tried things out containing the “organization” idea but most of the hick ups didn’t work. It took me a while to find the right word for the “organization” to give it a more materialized meaning. I came up with “package”. Organization is the packaging of the jewelry piece. This helped me by developing an idea and when I am writing this I am in the middle of the making process.


mad5 mad7

I made a material change to plastics. Namely because plastics immediately speaks to me as a material mostly used for packaging. I used two different kinds of plastic, a transparent one and a semitransparent one. I sewed the layers together and captured the necklace inside. The thread of the first necklace broke inside the package, though it is possible to wear this jewelry piece.

The second try out is a little more advanced. I used a different kind of thread, but the middle part of the plastic is still there what directly means that this piece is not wearable yet. The aim is that the middle part is part of the package but easy to take out if you want to wear it as a necklace. I like the plastic material but still it is not package-like enough. An advantage of this material is that it is flexible, what makes it nice to wear.

At this moment I am still in the process of making the ‘organization’ for a necklace. The package and the necklace has to work together as a symbioses. Step by step I come closer to the end result of my jewelry piece.

Experimenting with different materials is something what I really like to do and what I can do a lot in this project. Now I am focussing on finding a way to use plastics to capture the jewelry piece. Finding the right plastic is harder than I first expected. For the last experiment I made, I used the vacuum machine. Unfortunatley the plastic I can use for this machine is too thick and hard to bend. It will not form around the human body, which I find important for jewelry. I have to find another solution for this and will try to stick with the vacuum machine because it gives the perfect look of something what is packaged. Soon I will visit a cheese shop where I can vacuum one of my necklaces with there soft, thin, package material for cheese.


mad4

Necklace, captured in a not bendable plastic.


How an object becomes a part of us.


Monday, May 18, 2015

So

I don’t know why  I have this anxiety about smartphones.

Maybe, it’s about dependence, it’s about feeling like something is missing when you don’t have it with you, like an actual part of you is missing.

Do we need smartphones, to avoid loneliness ? The relation we have with our phones are so intimate, we hold them in our hands, they connect to our bodies and become an extension of it.

My research became really visual as I found images that spoke stronger for themselves than what I was writing. Here is a selection :


existenz_controller Images from the Cronenberg’s movie ExistenZ came back to my mind. In the movie, the design of this object really intrigued me, this “game pod” [x] that could have been electronic but that is made in a really organic way. They plug it in their spinal column to be able to connect to it and play. Human and the machine are then one.


glove-one-the-wearable-phone-is-real-2 Brian Cera is a designer that did this phone/glove called Glove One [x]. He says: “It presents a futile and fragile technology with which to augment ourselves. A cell phone which, in order to use, one must sacrifice their hand. It is both the literalization of Sherry Turkle’s notion of technology as a “phantom limb”, in how we augment ourselves through an ambivalent reliance on it, as well as a celebration of the freedom we seek in our devices.”

 Another picture that was significative in my research

Capture d’écran 2015-03-24 à 18.45.45


Of one of my first steps, I made this picture to visualize what I wanted to do

 cellphonealien1


Quite fast I started to make some objects with clay as I wanted to work with touch and the feelings of materials in my hands. I wanted to make an object that you could use instead of your phone. An object that would be made with organic shapes and give a  conforting feeling. After using clay I wanted to try softer materials, more fleshy, I started with silicone and end with latex. Here is the evolution.

_MG_8411 - copie1 _MG_8383 - copie

_MG_8384 - copie _MG_8385 - copie

_MG_8396 - copie _MG_8401 - copie1

_MG_8403 - copie1 _MG_8404 - copie1

_MG_8410 - copie _MG_8415 - copie1

_MG_8426 - copie1 _MG_8429 - copie1

_MG_8435 - copie1

_MG_8436 - copie1

_MG_8452 - copie1

This is my final object, made out of latex.


I & O


Sunday, May 17, 2015

q1

q2

q3

q4

q5

q6

pic1

pic2

pic3

pic6

Sound Sock


Saturday, May 16, 2015


Startingpoint

The startingpoint to my design project  was my interest in costumemaking and theatre. I arranged a meeting with the costumedepartment of the Nationale Opera & Ballet in Amsterdam. During my visit I gained insight into the process of costume making and was struck by the amount of detail, creativity and knowledge that goes into every piece.

What inspired me most was the fact that the goal is to create the perfect illusion, to make something look like the real thing in order to make a play, character or story believable.

First Tryouts

To kick off my research I applied the idea of creating the perfect illusion onto the example of a sock. The questions I asked myself were:


How is a sock constructed?

-What happens when commonly used materials are replaced?

-When is a sock a sock?


tryout2


When taking a closer look at my try-outs it was clear that replacing common materials with new ones not only affected my object’s appearance but could potentially change its function. All of a sudden that sock had turned into something more. I decided to investigate this aspect more closely by moving away from the idea of simply creating a visually authentic object, like it is mainly the case with costume making. Instead I tried to find a new or added function that would derive out of the use of a different material.

All the materials I had used so far in my research had/made very distinctive sounds. In the following steps I therefore narrowed my focus on 3 basic movements, 3 distinctive sounds and 3 different materials with the goal of making a sock that makes sound.


 Sound

When making music, people like to tap their feet. When I play the guitar myself the rhythms in my right foot can be reduced to these three movements:

kdungtaptick


*kdung*

*tap*

*tick*


After having limited and simplified the movements I chose three different materials that would fit each of them and represent them with a suitable sound, looking for a high pitch for the area below the big toe, a short tap for the footpad and a dull, low sound for the heel.

Metal (big toe), plastic (footpad), plaster (heel); shaped to match my own footprint as it taps the floor:

3materials


Final Object

To combine these three sound-elements into one wearable and therefore flexible and fitted object, I needed a third component. For that part of my final object a material research I had made earlier on during the process, a combination of jersey fabric and metallic isolation material, seemed to have all the needed qualities and even came with an additional effect: a rustling, swooshing sound as the foot is being bent, the final sound.


final


Playing the Sock

Trying to play with the sound-sock I noticed that it takes a quite some practice. Even though the number of different sounds is limited to three they can be used with a lot of diversity, combined, separated, fast and slow. The following video gives a brief idea of how the sock sounds and can be used:
 

Get the Flash Player to see this content.


architectural rendering: about


Saturday, May 16, 2015


Screen Shot 2015-05-16 at 2.34.29 AM

Screen Shot 2015-05-16 at 2.35.28 AM

Screen Shot 2015-05-16 at 2.36.35 AM

read it all on ISSUU

Through the stages of chewing gum.


Saturday, May 16, 2015


                                              oO.oO

                                       .oO.oO.oO.oO.oO

                                    .oO.oO.oO.oO.oO.oO

                                       .oO.oO.oO.oO.oO

                                             .oO.oO


.oO  STAGE 1 : Culinary World
[audio:https://designblog.rietveldacademie.nl/wp-content/uploads/2015/05/STAGE-1.mp3|titles=stage 1]

.oO  STAGE 2 : Roel Oostrom
[audio:https://designblog.rietveldacademie.nl/wp-content/uploads/2015/05/STAGE-2.mp3|titles=stage 2]

.oO  STAGE 3 : First Sketch 
[audio:https://designblog.rietveldacademie.nl/wp-content/uploads/2015/05/STAGE-3.mp3|titles=stage 3]

.oO  STAGE 4 : GUM!
[audio:https://designblog.rietveldacademie.nl/wp-content/uploads/2015/05/STAGE-4.mp3|titles=stage 4]

.oO  STAGE 5 : Maizena Experiments
[audio:https://designblog.rietveldacademie.nl/wp-content/uploads/2015/05/STAGE-5.mp3|titles=stage 5]

.oO  STAGE 6 : Chewing
[audio:https://designblog.rietveldacademie.nl/wp-content/uploads/2015/05/STAGE-6.mp3|titles=stage 6]

.oO  STAGE 7 : Hunting For Material
[audio:https://designblog.rietveldacademie.nl/wp-content/uploads/2015/05/STAGE-7.mp3|titles=stage 7]

.oO  STAGE 8 : Perfect Wrapping
[audio:https://designblog.rietveldacademie.nl/wp-content/uploads/2015/05/STAGE-8.mp3|titles=stage 8]

.oO  STAGE 9 : Experience Of Chewing
[audio:https://designblog.rietveldacademie.nl/wp-content/uploads/2015/05/STAGE-9.mp3|titles=stage 9]


.oO THE GUM                                              .oO THE DIP 

SONY DSC    SONY DSC

.oO THE PACKAGE

SONY DSC


dis play


Friday, May 15, 2015


who inspires you?

she asked

who?

I thought…

what?

I thought then…

meet this person and get inspired

make a work out of this experience

she said

and so I met a fashion designer

young man

very pretty

he said that fashion is like a colouring book

we have certain outlines and we have to fill the ´surface´

and then he said a lot of other thing, too

and made me pay for his coffee

and then, biking through Albert Cuypstraat, I was thinking of the colouring books

and about what it is, that we are filing the given shape with

finding:

Yamaha

Pepsi

24

N-power

Avis

I love sport

Fedex

Virgin

Bronx NYC crew

Alpinestar

nike just do it

WELLA PROFESSIONALS

keep calm and swag

avatar

dr.Oetker

clothing is a billboard

I understood

a display which is touching every single corner of our lives except the shower corner

and then I thought further what makes us want to proudly wear a company logo on our chests and how could we make a use of this display that we are constantly wearing

and then I did not know what to do for a while

and then I knew again

I made a plan to make a comfortable universal sweatshirt which will have a displaying function beside the warm keeping, protecting and covering one

what would I fill the surface with?

what surface?

I wondered

and so I bought a surface

blank, grey sweatshirt

I decided to make a use of the existing shape of the sweatshirt and challenge the idea of temporary and replaceable advertisement on it

but how?

I thought

Removable sleeves?

but how?

adding a zipper?

or a velcro?

zipper

and so I added a zipper on the sleeves and by doing so, I allowed the printed advertisement/ promotional element to be easily removed or replaced by another one

I made a list of small businesses that I really truly want to support and promote

I gathered the logos of all of them


2mala1 mala kopie


the print will come on the sleeves

I made another decision

but how?

screen print?

okay

the screen print studio works on the base of appointments

you must discuss your idea with the screen print assistant first

then an appointment is made

attention: it sometimes lasts over two weeks

you start printing with the assistant

hopefully you can work independent later

costs

yes costs…

no

I am not going to screen print my logos

what else can I do?

transfer print it

of course

I printed my logos onto a specially coated transfer paper

then they were applied onto textile under the heat press

and there it was

logos on my sleeves

I looked at the sweatshirt in my hands

I wanted to wear it immediately

and I did

and it felt good

but it did not feel good enough

so I took it off and looked again

and after some time I wrote down

70cm metal zipper standard + another sleeves + velcro pocket question mark

and then I went to Jan

and made another pair of sleeves

black

I put transparent, removable pockets on them

and I like them a lot

and then I looked again

they told me I have to look and reflect on my work during my process

so I did

I reflected

and I asked myself

what is it that I have now?

sweatshirt design?

yes

and what else?

and then I started my analysis

see here: video


33 16

1 21


center expansion


Friday, May 15, 2015

i was interested in the term “meta-modernism” that i had been reading about, so when we got this assignment i decided that i wanted to focus on that topic.
i found an artist named Jonas Staal that works in a meta-modernistic way.
before my meeting with Jonas i made some research about his work, and when we met we went straight into discussing his works.
he had one work about a new prison model, a thesis by the leader of the Freedom Party MP, Fleur Agema.
(book is called Art, Property of Politics III: Closed Architecture if you want to read more. you can download the publication with this : link)

this publication became a starting point for me, as i was inspired to change/improve/alternative solution of an existing structure.
i decided that i wanted to “minimize” the gap between the suburbs and the city center, a topic that have been very discussed in Swedish media lately.
to enter this topic, I felt that starting with something I already know would be a good starting point. to this took me back to Sweden, mainly in Gothenburg.
i tried to find out what have been done/tried to be done, to “solve” it.
there were a lot of different approaches.
i am going to mention some of them briefly:

–       back in 1985ties if you were a Swedish citizen and moved to the suburbs, you got 15% of your rent.
–       some apartment buildings had rules, that X apartment is only for Swedish citizens, in apartment Y you can only live if you are a non-Swedish citizen, and in apartment Z you can only live if you are over 50.
–       a large number of high schools have been built outside the city center, to send people outside of the center.
–       building large shopping-malls with a number of exclusive stores that can not be found anywhere else in Gothenburg.
–       building villa-neighborhoods and schools for kids age 6-12.

with this knowledge in my mind, I started sketching up a city plan, as you can see below.
citylayout


hus5


my idea behind this plan is based on what have been tried before. but how come those plans did not work?
why do I go out of the city center?
with these questions in my mind, i decided to make a construction plan where student housing/cheap housing, is built around a galleria with some exclusive stores.
when i leave the center it is because i am going to visit someone or if i need to go to a specific place to buy something.
the area i decided was a place where it was possible to make fast collective traffic and effective bike lanes into the center and out to the neighborhood.
instead of creating a new area, how can i expand the already existing center?
here are some try-outs where i try to add to already existing buildings:


hustry12345SvampHus


designhusgrej


HusRiktigtExampel_1100


with the try outs above, i tried to use the space that would not take up space on the ground but still expand the construction of the building.
in the last picture, i was trying to work with two buildings and a piece to connect them, that made made me think of Tetris, and my work took another direction.
into something you can always keep adding as long as you have the right pieces.


tetris3   tetris5


tetris4


TetrisIRL TetrisIRL3


Note cup for composers


Friday, May 15, 2015

I met my professional, Niek, a music student, for this cooperation design assignment. Since he is a composer, I am more interested in way how rhythm is made than the way how sound is made, which means that my direction is related to composing rather than instruments.
Niek told me how he usually makes music: when he has an idea he normally writes them (music notes) down on his notebook and then deals with it when he goes home. However sometimes he has no inspiration, especially when he wants to make something new. Then I found that I can make a tool that helps composers make new ideas in an extreme helpless environment. I went directly to the language of composers: staff (stave). Simply speaking, staff is the thing that tells musicians on which moment which tone should (or will) come out, the position of notes tells how high or low the tone is and different shapes of notes tells the length of the sound.
pianonotesdiagramsmaller

images_muzieksleutel

My idea was to create new pieces of staff as a starting point for composers. Once there is one good part of rhythm they can finish the rest. Since Niek and I made the conversation during drinking coffee, I found that a cup can be a good form for the tool — small and functional. The point was to produce new pieces of staff completely random and potential of unlimited results.
1st step:
Thinking to make a tea set with a transparent cup and a plate with five circles or arcs which represents the staff. When the composer spin the cup on the plate, from above he can see the handle of cup point out different notes. I studied a lot of round patterns but finally found out that it can’t work at all. The handle always points the same note or a same piece of music. Then I realized that the circle staff isn’t necessary.

Cirkles_1st-period2

2nd step:
I researched how notes can move at the bottom of the glass.

s1


3rd step:

I turned to make a transparent cup cover with traditional blank staff (five straight lines) and put five to seven flowing dots as note at the bottom of the cup.

s2s2-2


4th step:

Decided to let the cup itself carry all functions, which means that there’re no additional part for it, also simplify the shape of the cup. The black notes work better than white ones since they can be seen through tea or colored soft drinks.

s3-1_500s3-2_500s3

adjust

(this is a .gif, click to see the whole)

It is a pity that people from glass workshop told me that it is not so possible to make this cup precisely with glass because the whole process will be in a hot environment, the liquid and my hot glue notes won’t survive.  Despite that, I’m quite happy about the result, and the experiment is telling me that this cup really works.
Check it and you can ask me for that piece of ringtone ~

Get the Flash Player to see this content.


Object of Curiosity


Thursday, May 14, 2015

When we got an assignment to contact a person that influences and fascinates us I got lost for a moment. There are simply too many people whom I would be curious to meet and ask about their work and inspirations! After a couple of failed email conversations with hard-to-reach professionals I decided to try another way. My inspiration came spontaneous as a follow up of my daily curiosities. I personally find it very stimulating for my own working process to make a step aside from the main route and see what is it there behind the corner because you never know! Following this simple idea I went to a butchery I have been to recently. I already had a short encounter there with a butcher Mike and a video of him slicing slaughtered pig. Therefor we met again and I had a great opportunity to spend some time at the butchery with the best butcher-guide! During that meeting I discovered the world of modern dutch butcher and afterwords continued on searching for the best object i could make to tell the story of this meeting. In the text below you can find all the process steps that led to the creation of the final piece- OBJECT of CURIOSITY.

First Reaction: Right after the meeting I decided to quickly summarize what had happened and what material I have now. I had a sticker with all of the information about the pig Mike was slicing and loads of videos documenting almost the whole meeting. I decided to make a list of tags which would describe that meeting.

Sticker from a piece of meat  2tags-about-the-meeting-copy

First tryout: My first idea was to make a fan with sharp knifes used as blades. I thought it would be a funny metaphor for the meeting. Chilling plus being dangerous.

First idea fan of knifes


Second tryout: Understanding that the fan idea is too flat I decided to try to make something what the butcher could use. Here is a sketch of some kind of logo/identity proposal.

second idea logo


Third tryout: After talking to my teacher and classmates I decided to go away from my direct design solutions and think more about what was my experience like, what made this meeting so special? The experience was unexpected, though the location of the meeting suggested some narratives, and the main conclusion I made was that my own curiosity led my towards this happening. I started sketching to figure out what object can look common but yet carry something surprising in it and trigger peoples curiosity at the same time.

2third-idea-taste-the-curiosity-copy


Final idea: To go further I decided to ask my friends in what situations they feel the most curious? Receiving their opinions I understood that all of them were naming the situations where the communication with other people involved. At this point it became obvious for me! That now I want to make something that I can give to others, something that will become something else when used by people. And here came the idea to make some kind of lottery ticket called OBJECT of CURIOSITY. It will help people to create their own Object of Curiosity and at the same time will be object that contains the curiosity in itself. Here is the first version of it.

Final idea- object of curiosity tryout Final idea- object of curiosity tryout 2


Final design: To make it look more like a lottery ticket I made a design for the object and used special techniques by applying scratchable lines on it.

objectof curiosity final version


Final move: To finish my project I asked two of my friends to test OBJECT of CURIOSITY and sketch their own Objects of Curiosity. Here below is what came outcome.

object of curiosity used by ValdemarValdemars object of curiosity


object of curiosity used by RubyCURIOSITY-ruby_900


OBJECT of CURIOSITY is a lottery ticket to the greatest trip of your imagination! In this object I tried to combine suspense with excitement, make it open and closed at the same time and, above all, interactive. This is a metaphor for the process of my work and a useful tool for others.


!BE CURIOUS!

#STICKY #SWEET_SMELL #MUSELS #VACUUM #MAFIA #BLOOD #SLAYERS #DELIVERY #FRESHLY_SLICED #HASH #FREEZER_ROOM #SALTED #DRIED #EX-ANIMATOR #GANGS #JEW_BUTCHER_FROM_30s #AIR_CONDITIONER_IN_A_WARDROBE #WINNER_OF_2013 #CLEAN_EVERY_WALL_EVERYDAY #BUBBLES #SHARP_KNIFE-THE_MAIN_RULE #STAB_YOURSELF #CHILL #FAMILY_BUSINESS #CUSTOMERS #BACTERIAS #SALAMI #HOOKS #HAIR_STYLING #VAN_PERSIE #FOOTBALL #DRUNK- AGRESSIVE WOMEN HARASSMENT CHILLED MEAT TO TASTE BETTER #YOUNG_MEAT- NO_TASTE #TEENAGE_MEAT #CUT_CLOSE_TO_THE_BONES

STARSTRUCK


Wednesday, May 13, 2015

01_animation_EX_book

Hello Experimental jetset

My name is Claes and I’m a student at the rietveld academic, and my design teacher has given us an unusual assignment to contact people that influence our work and see if we can spend a short period of time with them. I had the chance to talk with one of you at the San Serriffe bookstore a while back and it was a really nice conversation. Your group is a huge inspiration to me and contacting you was the first thought i had! I hope that we could work something out at your convenience.

I look forward to hearing from you!

Best regards,

Claes

This is the first mail I sent to EJ and the starting point for a really nice project which resulted in a book that you can see as the gif above.

The research publication can be found in the attached PDF at the bottom. The research publication is about the work before and after the meeting with EJ. This meeting lead me to the conclusion that “less is more”. Enjoy.


IMG_0730_2_500px

“The tattoo I got is the worst and best…. But I would never show it to them, they would think I’m a freak”

research publication


BREAD


Wednesday, May 13, 2015

I spent approximately 3 months doing intermittent research and experiments related to bread making. I looked a lot at the process of making bread, the associations and relationship that we have with bread and tried to think about bread making in a different way from what has become such a stable and set way of working with and interpreting bread. This all sounds a bit silly, and in a lot of ways it was – one of the conclusions I came to was that because bread has been such a common practice for such a long time that the way that it is done has been refined so much that it does not need a design student to come along and ‘re-invent’ it. When I came to this realization in many ways it opened me up to experiment more and in different ways without worrying about the experiments having any particular meaning or significance.

Punch

I started my project by getting up at 4 in the morning and spending a few hours watching a professional baker work and talking with him about bread and baking. I was amazed at how he seemed to always know exactly what needed doing next, he almost never paused to think about what the next thing to do was. A good moment was when I had just arrived, he was pouring out some walnuts from a large bag into a bowl and one dropped on the floor; thinking to be helpful I picked it up and after a pause of not knowing where to put it I set it down on the corner of the metal work surface. Issa instantly picked it up and put it in a small bowl lower down and gave me a bit of a smiley but ‘what an idiot’ look which was fair, I hadn’t considered the hygiene level in a professional food environment!

P1110728

One thing that I particularly liked about watching the baker work was the scoring of the bread before it goes into the oven. I originally thought it was just an aesthetic thing but it is an important element as it allows the bread to rise properly and cook more evenly, by scoring in a controlled way it also means the bread does not just split in random places. As a result of these thoughts I decided to do a small workshop with 4 of my class mates where I provided them with a piece of dough each and a razor blade and encouraged them to form their dough in whatever way they wanted and to try avoid the conventional way that bread looks. It was a fun experiment and brought a diverse range of results which I think pose an interesting question to how we all have a very set way of what we expect bread to look like and how it can be altered.

P1110754 P1110761 P1110784

As a continuation from that workshop I thought again about the lack of experience and in particular tactile experience that we have with bread even though most of us are so familiar with it as the finished product. For my next experiment I decided to teach a friend of mine who has very little interest in cooking/baking and virtually no experience in bread making but eats bread almost every day how to make bread.

Having watched a professional at work and been inspired to go and experiment with baking myself I wanted to pass on the experience that I had had onto someone who was unlikely to have experienced it before. I guided my friend through the simplest bread making and talked to him about his connection, or lack of it, with bread. As I am just learning myself it was enjoyable to guide him though it in an amateur way and work certain things out together at points and the discussion was entertaining. I was not looking to inspire him to become a regular baker but just to share the experience of making bread and hope that it would change his relationship with the thing he eats so often.

I also enjoyed the extreme amateur situation that we were doing it in, we did it in my tiny student accommodation kitchen and improvised a lot of parts where we didn’t have the space/equipment that a professional would use. This extension of the amateur level that we were baking at was something I enjoyed particularly because it shows just how simple bread making can be.

These are just a few examples of experiments that i tried out during my process, the project is ongoing and now I bake my own sourdough bread once a week and continue to experiment with the shape and ways that we look at and use bread.

Scan 23-cropNeckSandwich

Scan 25

Personal Mass


Tuesday, May 12, 2015

I decided to visit a glass factory, I met Just who controls the machines that generates 200.000 beer bottles per 8 hours. I wanted to see the mass production of daily glass objects, wine glass, beer bottles etc. The contrast between the two images that glass has: The cheap, functional mass product and the crafted, expensive, complicated, cultural acknowledged glass, was clearly visible in the factory visiting the production part and the craftsman department. Both in the same factory, two completely different stories.
I decided to learn to make my own hand crafted beer bottle to combine the cheap image of a beer bottle with the expensive one of crafted glass. This process was longer, intenser, more impossible and way more difficult then I ever thought. In the end this process, of searching for  methods getting to know the material (a little bit) and working together with all the elements that need to be just right in order for the glass to do what you want it to do, took over the functionality of the bottle.
You work in service of the glass, if not it will master you. I had to adept towards what the glass needed, the time, the pressure, temperature. I could wish for all that I wanted but there was only one way to go. The focused and calm research of the glass. It feels silly or a bit like a cliche, but the glass forced me to work in a way which I often try but where I also often fail, it made me really be in the process.


Measuring the bottle  Blow a bubble Take glass two times

Blow

Shape it Glass to thin at the bottom Broke when putting in cool down oven Blow a bubble

                                     Take glass two times

Blow

Bubble a bit small

IMG_1144

Shape it

When putting in the oven    Broke

Blow a bubble     Take glass two times   Really hot Blow   Bubble a bit small     Shape it     Put in oven  Heavy

Blow a bubble        Shape it         Really thin glass      Broke when putting in the oven


Get a piece of colored glass    Blow a bubble     Take glass two times


IMG_1149

Shape

                             Blow

                                                   Shape
Bottom to thin
Broke when putting in the oven

Get two pieces of colored glass  Mix them Blow a bubble   Take glass two times

Shape

Blow

Shape

IMG_1143

Open cold wind

Glass cools down

Falls off

Broke


Make shape in sand  Make sand wet Poor glass into shape  Sand to wet starts to boil  Making a glass volcano

IMG_1145

Making a mold from plaster  Get glass  Blow a bubble More glass                 Blow  More glass  Blow  More glass

                                                                                                 Blow

Turn a lot

Shape a bit Wait for perfect temperature Open mold Let the mass sink perfect timing closing the mold

Press mold as tight as possible

IMG_1330

Blow

Blow

Blow

Blow

Blow

Press

Open mold Take out the glass

Cool a bit

Make a cutting line Glass to cool for cutting line Broke

Fall down Transfer to cool down oven asap

IMG_1337

Blow Turn a lot  Shape a bit Wait for perfect temperature

Open mold Let the mass sink Perfect timing closing the mold

Press mold as tight as possible

Blow

Blow

Blow

Blow

Blow

PPPPPPPFFFFFFFFF

Press Open mold                 To little glass and to cool                     Take out the glass

Cool a bit and Transfer to cool down oven asap

Get colored glass Making a mold form plaster Blow a bubble

Get more glass Blow   More glass Blow   More glass  Blow    More glass

                                                                  Wait

IMG_0024

turn a lot Shape a bit Wait for perfect temperature Open mold Guide mass of glass bubble into mold Let the mass sink Way to hot and to much glass Drops quickly to the bottom Try to safe glass by pulling the pipe all the up                Pressing the mold

Blowing

Pressing

Blowing

pressing

Glass goes trough the sides of the mold Open mold Glass still soft

11231705_10152962643988931_110610957932174378_n

Rest glass on floor get gloves Pick up glass  Bring to cool oven


Didn’t I see this before?


Saturday, May 9, 2015

Didn’t I see this before?

dejavu-gif


Have you ever had this strange, but uncertain feeling that you have experienced something before? An overwhelming sense of familiarity? A moment you are not sure if something similar or the exact same thing already happened? Then you belong to the majority of people who have had a déjà vu. Scientists are still unsure how to explain this phenomenon. Some try to link it to memory functions, claiming that familiar events can trigger memories of forgotten information. Some say it’s a more like a “memory check” of our brain: a signal that there is a conflict between what we think we’ve experienced and what we actually did experience.

In a web app I created for iPads you can move along stories told by various images and collages of hands. Sometimes you end up at a point you think you have experienced before. But is it really the same, or does it just familiar? You might just have a déjà vu.

There are other interesting theories as well that try to explain a déjà vu:

Precognition: We have the power of foresight. A déjà vu is the evidence that we are actually able to predict the future.

Reincarnation: We have lived before. A déjà vu is the surfacing of a hidden memory, evidence of a previous existence.

Higher dimension: Our consciousness actually exists outside of our physical bodies in a higher dimension, and when a déjà vu occurs, it’s a brief moment when that separation becomes clear.

Parallel universes: There are other versions of ourselves, living in parallel universes. A déjà vu is a moment we share a memory with an alter ego of another universe.

When browsing through the internet, we often experience this feeling of familiarity. Links and tags create a confusing net of intertwined information, often taking you back to a page you have been before. But because of the information overload we are exposed to, we are often not sure. Maybe you experienced it while surfing through the Design Blog, using the various tags. And you asked yourself, didn’t I see this before?


Log in
subscribe