Skip to Content Skip to Search Go to Top Navigation Go to Side Menu


ON MAKING COFFEE


Tuesday, April 1, 2014


Martina Turini* and Matilda Beckman talking together on the subject of getting people talking


Each project that students initiate, makes them into temporary experts on given topics. Art & Design schools then become knowledge hubs where different expertise cross fertilize. By looking at what types of research students engage in, Designresearch and UnBornLab organized a 'workshop' to investigate design matters from a students' perspective.

Through a series of short video's students from both the Foundation Year and the DesignLab department share ideas, focusing on the temporary expertise gained as part of their projects, rather than the outcome. The workshop was articulated around one of their given assignments. Students were asked to develop a specific object or context to help focus or explain content.

The format is clear: two persons, discussions, filmed from above.
the space is : two stools and a table.

* Foundation Year


ON EXPERIENCING LANDSCAPE


Tuesday, April 1, 2014


Darius Blokker and Dimitra Chrysovergi* talking together on experiencing landscape


Each project that students initiate, makes them into temporary experts on given topics. Art & Design schools then become knowledge hubs where different expertise cross fertilize. By looking at what types of research students engage in, Designresearch and UnBornLab organized a 'workshop' to investigate design matters from a students' perspective.

Through a series of short video's students from both the Foundation Year and the DesignLab department share ideas, focusing on the temporary expertise gained as part of their projects, rather than the outcome. The workshop was articulated around one of their given assignments. Students were asked to develop a specific object or context to help focus or explain content.

The format is clear: two persons, discussions, filmed from above.
the space is : two stools and a table.

* Foundation Year


ON UTOPIA


Tuesday, April 1, 2014


Bernadeta Rimutyte* and Jens Toni Willumsen talking together on the subject of Utopia


Each project that students initiate, makes them into temporary experts on given topics. Art & Design schools then become knowledge hubs where different expertise cross fertilize. By looking at what types of research students engage in, Designresearch and UnBornLab organized a 'workshop' to investigate design matters from a students' perspective.

Through a series of short video's students from both the Foundation Year and the DesignLab department share ideas, focusing on the temporary expertise gained as part of their projects, rather than the outcome. The workshop was articulated around one of their given assignments. Students were asked to develop a specific object or context to help focus or explain content.

The format is clear: two persons, discussions, filmed from above.
the space is : two stools and a table.

* Foundation Year


ON AN ODE TO A FONT


Tuesday, April 1, 2014


Chelsea Peterson* and Waël ell Allouche talking together about an ode to a font


Each project that students initiate, makes them into temporary experts on given topics. Art & Design schools then become knowledge hubs where different expertise cross fertilize. By looking at what types of research students engage in, Designresearch and UnBornLab organized a 'workshop' to investigate design matters from a students' perspective.

Through a series of short video's students from both the Foundation Year and the DesignLab department share ideas, focusing on the temporary expertise gained as part of their projects, rather than the outcome. The workshop was articulated around one of their given assignments. Students were asked to develop a specific object or context to help focus or explain content.

The format is clear: two persons, discussions, filmed from above.
the space is : two stools and a table.

* Foundation Year


ON BEING LOST


Tuesday, April 1, 2014


Max Daalhuizen and Ida Hansen* talking together about the subject of being lost


Each project that students initiate, makes them into temporary experts on given topics. Art & Design schools then become knowledge hubs where different expertise cross fertilize. By looking at what types of research students engage in, Designresearch and UnBornLab organized a 'workshop' to investigate design matters from a students' perspective.

Through a series of short video's students from both the Foundation Year and the DesignLab department share ideas, focusing on the temporary expertise gained as part of their projects, rather than the outcome. The workshop was articulated around one of their given assignments. Students were asked to develop a specific object or context to help focus or explain content.

The format is clear: two persons, discussions, filmed from above.
the space is : two stools and a table.

* Foundation Year


ON DEMOCRATISING DESIGN


Tuesday, April 1, 2014


Rixta van der Molen* and Frank van ‘t Woudt talking together on the subject of democratising design


Each project that students initiate, makes them into temporary experts on given topics. Art & Design schools then become knowledge hubs where different expertise cross fertilize. By looking at what types of research students engage in, Designresearch and UnBornLab organized a 'workshop' to investigate design matters from a students' perspective.

Through a series of short video's students from both the Foundation Year and the DesignLab department share ideas, focusing on the temporary expertise gained as part of their projects, rather than the outcome. The workshop was articulated around one of their given assignments. Students were asked to develop a specific object or context to help focus or explain content.

The format is clear: two persons, discussions, filmed from above.
the space is : two stools and a table.

* Foundation Year


ON THE IMPORTANCE OF BEING NAIVE


Tuesday, April 1, 2014


Casper Braat and Bára Bjarnadóttir* talking together about the importance of being naive


Each project that students initiate, makes them into temporary experts on given topics. Art & Design schools then become knowledge hubs where different expertise cross fertilize. By looking at what types of research students engage in, Designresearch and UnBornLab organized a 'workshop' to investigate design matters from a students' perspective.

Through a series of short video's students from both the Foundation Year and the DesignLab department share ideas, focusing on the temporary expertise gained as part of their projects, rather than the outcome. The workshop was articulated around one of their given assignments. Students were asked to develop a specific object or context to help focus or explain content.

The format is clear: two persons, discussions, filmed from above.
the space is : two stools and a table.

* Foundation Year


ON STORY TELLING


Tuesday, April 1, 2014


Pedro Herrero Ferrran* and Marko Bakovic talking together about the subject of story telling


Each project that students initiate, makes them into temporary experts on given topics. Art & Design schools then become knowledge hubs where different expertise cross fertilize. By looking at what types of research students engage in, Designresearch and UnBornLab organized a 'workshop' to investigate design matters from a students' perspective.

Through a series of short video's students from both the Foundation Year and the DesignLab department share ideas, focusing on the temporary expertise gained as part of their projects, rather than the outcome. The workshop was articulated around one of their given assignments. Students were asked to develop a specific object or context to help focus or explain content.

The format is clear: two persons, discussions, filmed from above.
the space is : two stools and a table.

* Foundation Year


ON WORKING WITH YOUR INTUITION


Tuesday, April 1, 2014


Arthur Maduro and Nadja Henss* talking together about the subject of working with your intuition


Each project that students initiate, makes them into temporary experts on given topics. Art & Design schools then become knowledge hubs where different expertise cross fertilise. By looking at what types of research students engage in, Designreseach and UnBornLab organized a 'workshop' to investigate design matters from a students' perspective.

Through a series of short video's students from both the Foundation Year and then DesignLab department share ideas, focusing on the temporary expertise gained as part of their projects, rather than the outcome. The workshop was articulated around one of their given assignments. Students were asked to develop a specific object or context to help focus or explain content.

The format is clear: two persons, discussions, filmed from above.
the space is : two stools and a table.

* Foundation Year


ON OPTIMAL SHAPES


Wednesday, March 26, 2014


Kristine Bech Sorensen and Jurigis Lietunovas* talking together about the subject of optimal shapes


Each project that students initiate, makes them into temporary experts on given topics. Art & Design schools then become knowledge hubs where different expertise cross fertilize. By looking at what types of research students engage in, Designresearch and UnBornLab organized a 'workshop' to investigate design matters from a students' perspective.

Through a series of short video's students from both the Foundation Year and the DesignLab department share ideas, focusing on the temporary expertise gained as part of their projects, rather than the outcome. The workshop was articulated around one of their given assignments. Students were asked to develop a specific object or context to help focus or explain content.

The format is clear: two persons, discussions, filmed from above.
the space is : two stools and a table.

* Foundation Year


ON THE BUBBLE


Wednesday, March 26, 2014


Salomé Roodenburg* and Nicolas Chuard talking together about the subject of working within the ‘Rietveld bubble’


Each project that students initiate, makes them into temporary experts on given topics. Art & Design schools then become knowledge hubs where different expertise cross fertilize. By looking at what types of research students engage in, Designresearch and UnBornLab organized a 'workshop' to investigate design matters from a students' perspective.

Through a series of short video's students from both the Foundation Year and the DesignLab department share ideas, focusing on the temporary expertise gained as part of their projects, rather than the outcome. The workshop was articulated around one of their given assignments. Students were asked to develop a specific object or context to help focus or explain content.

The format is clear: two persons, discussions, filmed from above.
the space is : two stools and a table.

* Foundation Year


ON DESIGN EDUCATION


Thursday, February 6, 2014


The bricks manifesto is a collaborative version
of ‘this is (not) a manifesto’ to bring people together
to discuss their education vision during DDW 2012.9

tumblr_inline_ms8phbzUvw1qz4rgp


UnBornLab
Presented at the graduation show of the Design Academy Eindhoven during Dutch Design Week 2013, UnBornLab is a masters project, initiated by Eugenie de Lariviere, looking at design education from a design student’s perspective.

It was important for me to understand education from my own perspective; as a student and a designer.
Mixing both a field research on a local level, and an academic research on a more ‘global level (that is the European level)I felt the need to always bring the theoretical part into practice, by organizing workshops, discussions, lectures, interviews (etc), in order to grasp an understanding of the big notion that is education.

One way to do so was to analyze how the system functions. I was able to get an overview of it by breaking it down into four ‘elements’, which together, represent the main ‘pillars’ forming our schools. These four elements being; community, structure, content and environment, the interactions they have together shapes the different academic institutions we know of.

(For example: Structure = Content implies that if structure makes content, it induces a top-down approach of knowledge, raising the question of knowledge accreditation, knowledge hierarchy, as well as of formal vs. informal knowledge. Whereas Content = Structure implies that if knowledge forms structure it leads to a more bottom up approach of producing and sharing knowledge for example; crowd source and open source systems. The same goes with structure = community vs. community = structure and so on.)

To communicate the concept clearly, I visualized these methods of the ‘four elements’ by quickly sketching them into volumes. It was once again a means of bringing the theory into practice by giving shape to the research. Making it physical also enabled me to reach people who did not feel strongly about the subject.

COMMUNITY-CONTENT_redu CONTENT-COMMUNITY_redu

Community = Content  vs.  Content = Community


Following on the idea of ‘rethinking’ education from a student’s perspective, I chose to look further on recent shifts in the relationship between ‘content’ and ‘community’, focusing on students as the bearer of contemporary knowledge.

With the faster availability of information the world is transforming at a greater pace and students are often proven to be quicker to adapt to these changes, may they be social, economical, political (etc). The content they bring in the school, as an addition to the curriculum, comes to show more applicability regarding the world they evolve in. In this process, schools go from being knowledge distributors to becoming intermediate spaces where a dynamic cross-pollination of knowledge happens.

The UnBornLab functions as an experiment to document students’ working processes as the basis for renewing design curricula.
The first step of the project was a blog to bring student’s current research (in this case their thesis topics) outside of schools.

DAE-BLOG

DAE Masters Blog


Believing in the importance of students’ self-taught expertise as a school’s temporary knowledge, the idea evolved in the motivation to create a dynamic archive of this knowledge by building a self-generating library of past researches.

Through a series of short video-interviews students present their work, focusing on the research rather than the outcome. Considering students as temporary ‘experts’ of their subjects, the videos can be seen as short introductions on given design topics. One topic leading to another UnBornLab intends to be the start of a dynamic knowledge database of ‘UnBorn’ designers.

UnBornLab_siteS_screenshot


The CMYK Colour Model


Tuesday, February 4, 2014

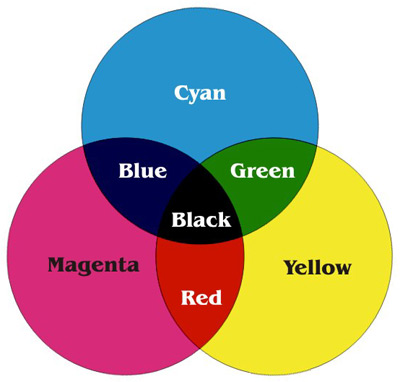
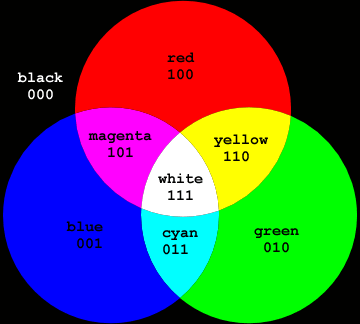
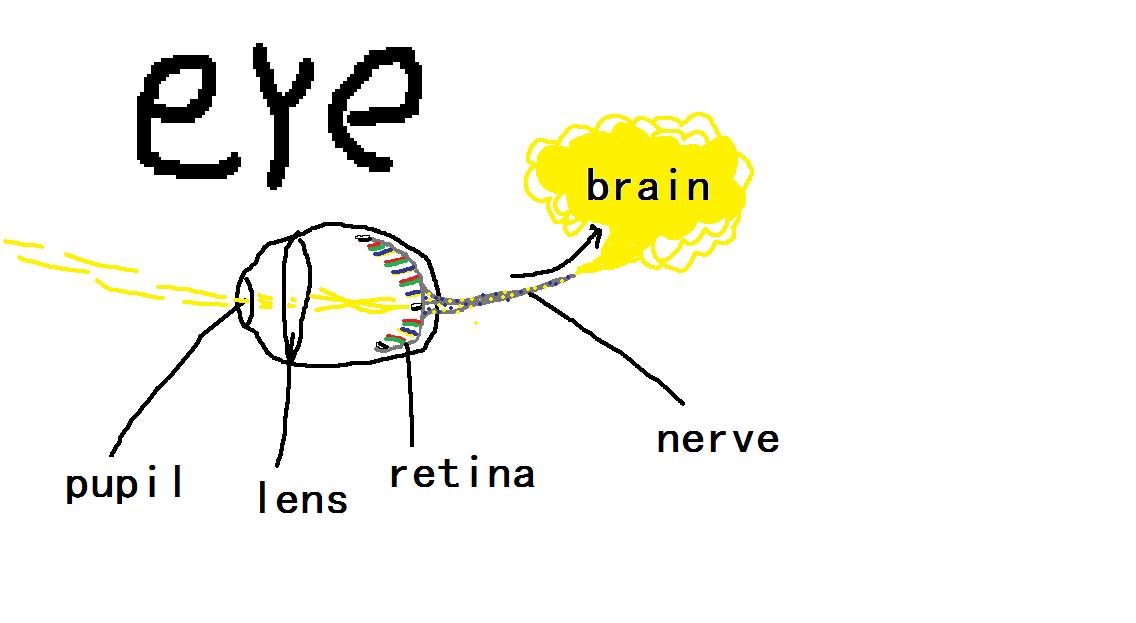
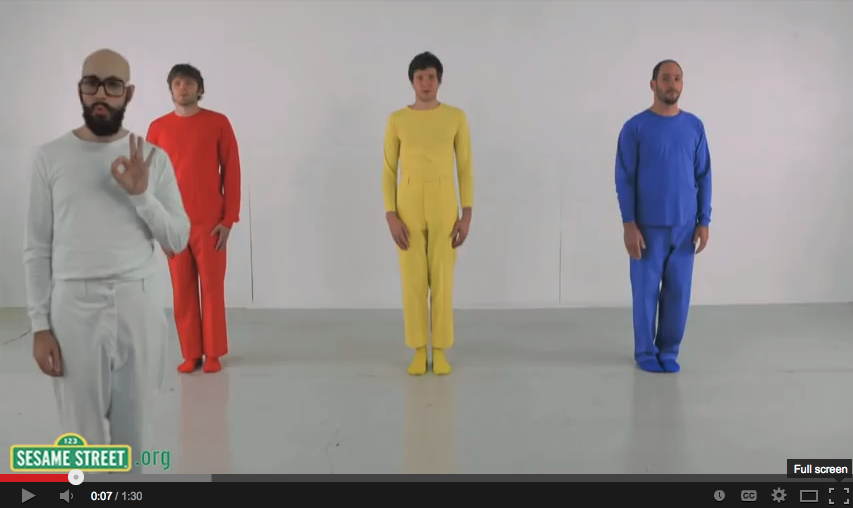
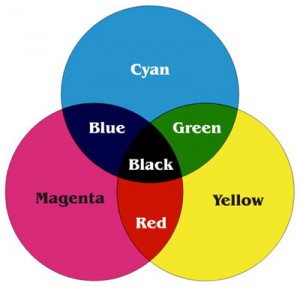
the CMYK colour model is short for cyan-magenta-yellow-key (black) and refers to all colours as mixtures of these four process colours. so, within this model, a colour would be described through the quotient of cyan, magenta, yellow and black that can be found in the mixture.

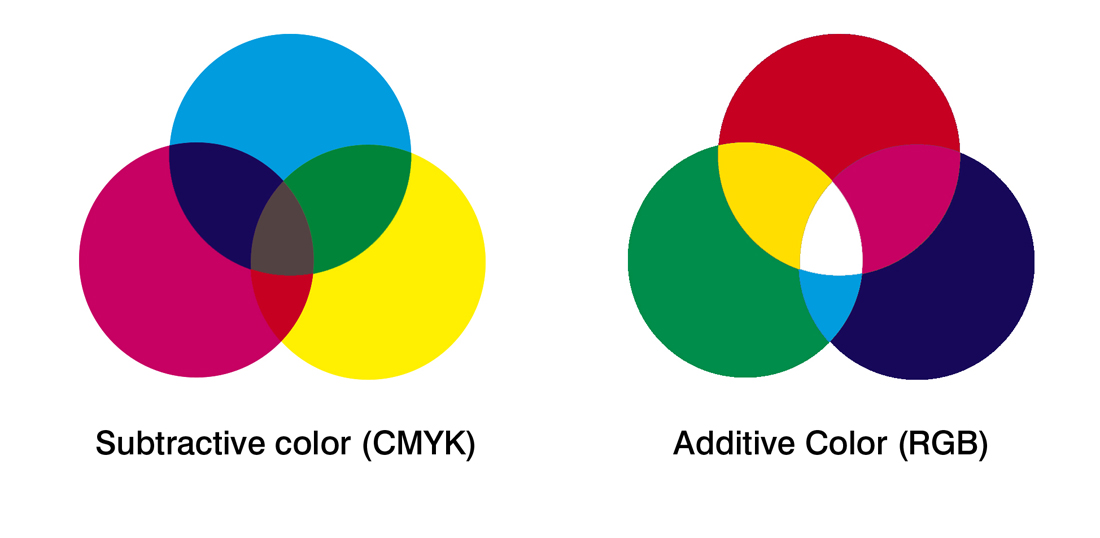
the CMYK colour model is predominantly used in the printing process and is often referred to as four-colour printing (which corresponds to the four inks used). in order to fully understand it, it is vital that we examine another colour model named RGB (red, green, blue) that is used in display devices such as computer monitors. so, whatever you see on a screen is in RGB. however, these colours can only be viewed with the aid of natural or produced light – making it impossible for documents to be printed as exact copies of what can be seen on a screen. this is why these documents must have their colours translated into CMYK prior to sending it to the printer.

all the heavily paraphrased information above seems to make sense on a superficial level, but in fact i find it all extremely perplexing and difficult to grasp. unfortunately i never learned the complex language of science and since it is awfully strenuous to translate a language one doesn’t understand, here is the even-more-technical-side explained by someone who seems to know what they are talking about:

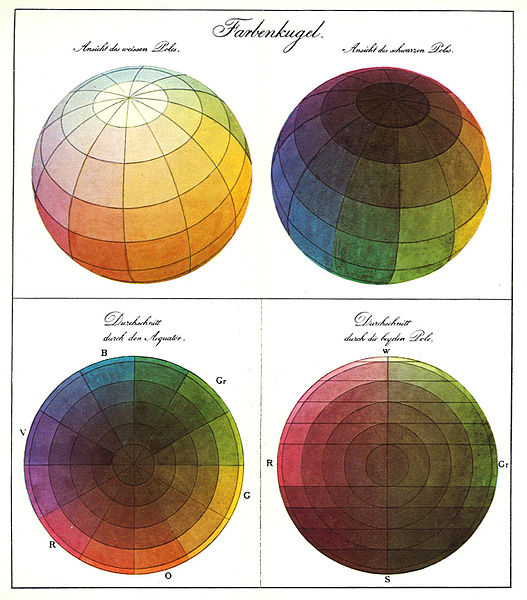
“When two RGB colors are mixed equally they produce the colors of the CMYK model, known as subtractive primaries. green and blue creates cyan (C), red and blue creates magenta (M), and red and green creates yellow (Y). black is added to the model because it cannot be created with the 3 subtractive primaries (when combined they create a dark brown). The K, or “key,” stands for black.” (taken from here)

subtractive-colour_redu

upon my investigation, i found that the aspect of the CYMK colour model that i found most compelling was the simple fact that a countless amount of colours are but a mixture of four: cyan, magenta, yellow and black. this thought was inevitably on my mind for days proceeding my research.


//

the idea for a translation of the CYMK model came to me when i was listening to Billie holiday’s  1941 version of “am i blue?” over a cup of coffee. it started me off on a long trail of thought which went a little like this:

blue? blue?! how has blue come to mean a sad & melancholic mood or person?

although the colour blue is used to describe a specific feeling, colour can also be used to illustrate mood or atmosphere – for instance – in less direct ways. this is apparent in art, music, poetry, prose… but why do we associate certain moods or meanings with certain colours? and more even-more-generally: why do we often have the urge to illustrate colourless things through colour?

i am extremely fond of the randomness of this occurrence  the randomness of the colour blue (with all its different tones) being chosen to represent something that is beyond blue literally, as a colour, a sensory experience…


//

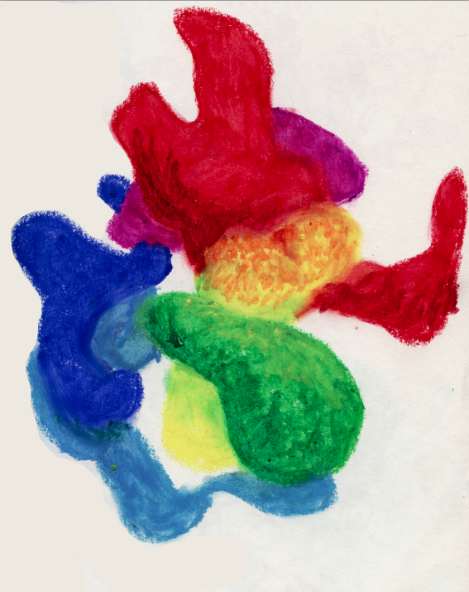
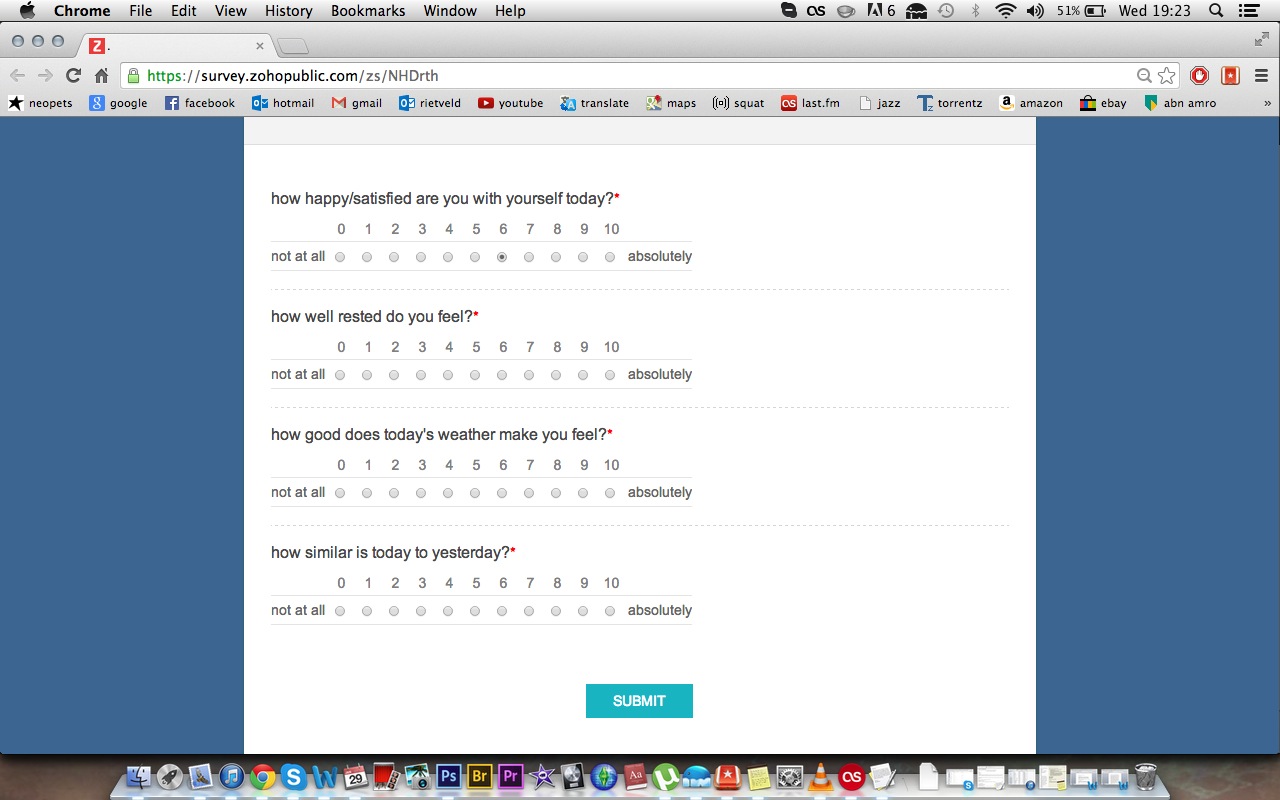
i had the idea of translating the CYMK colour system in a way that i made each colour (cyan, yellow, magenta and black) represent something different. and so i did. i decided that i was going to translate this system into a system that determined the “colour” of one’s day. first, i made a list of things that tend to have an effect on my day. then i selected the four that i felt have the most influence on the “mood” of my day. i proceeded to make them into questions (which can be answered on a scale of 1 to 10):

– how happy/satisfied are you with yourself today? (C)
– how well rested do you feel? (M)
– how good does today’s weather make you feel? (Y)
– how similar is today to yesterday? (K)

each of these questions substitute C, M, Y, and K accordingly. and when answered as a numeral value (from 1 to 10), i have the percentages i need to make a colour with the aid of photoshop. the system i’ve created is therefore a colour-determining tool.

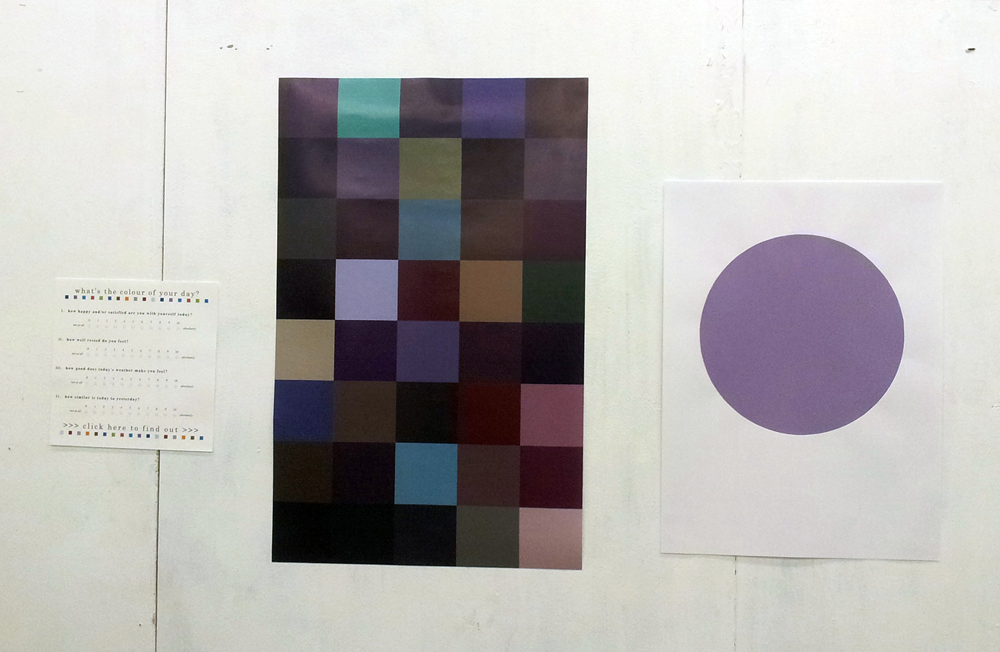
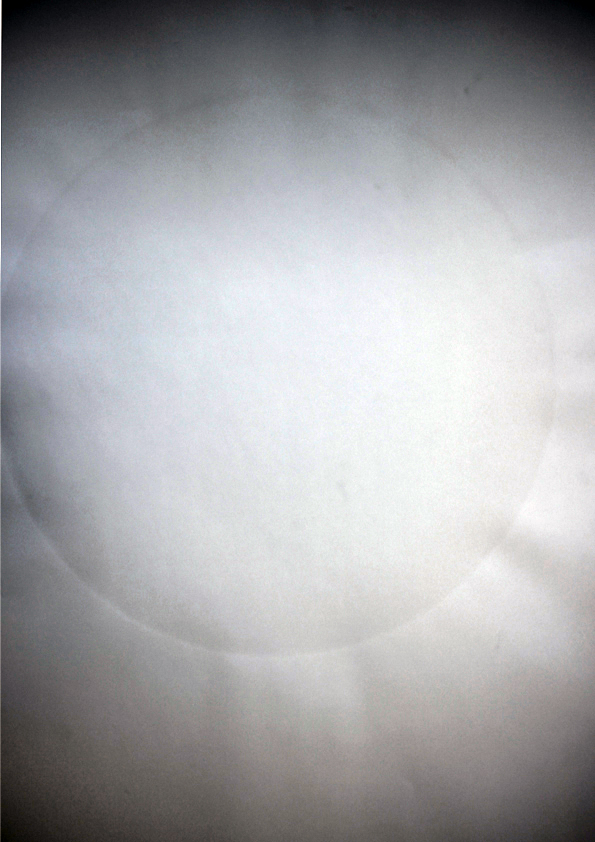
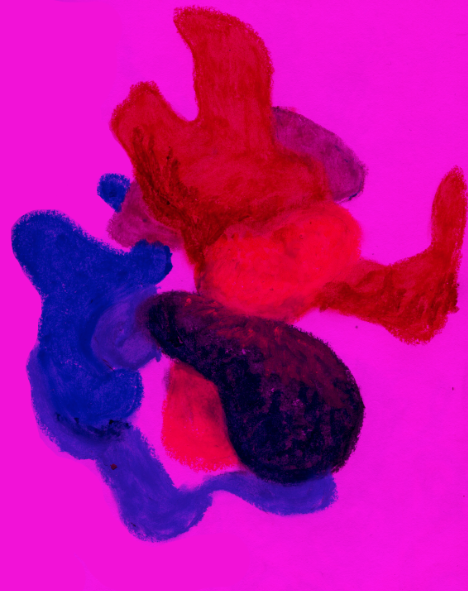
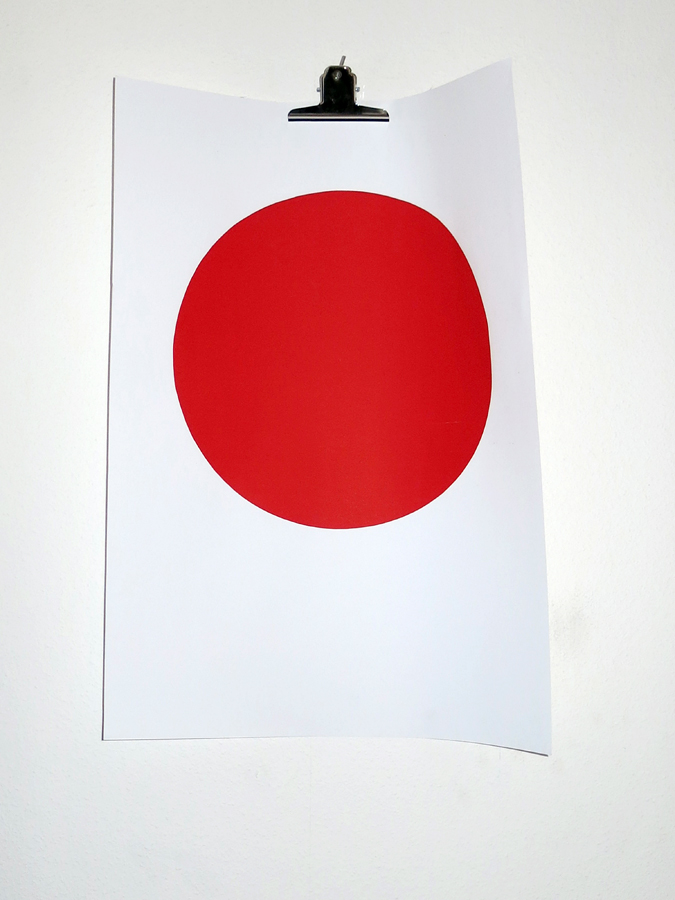
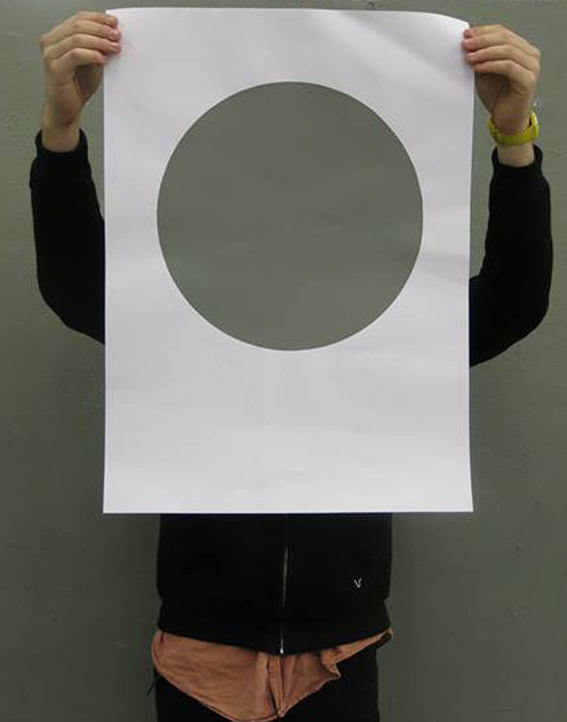
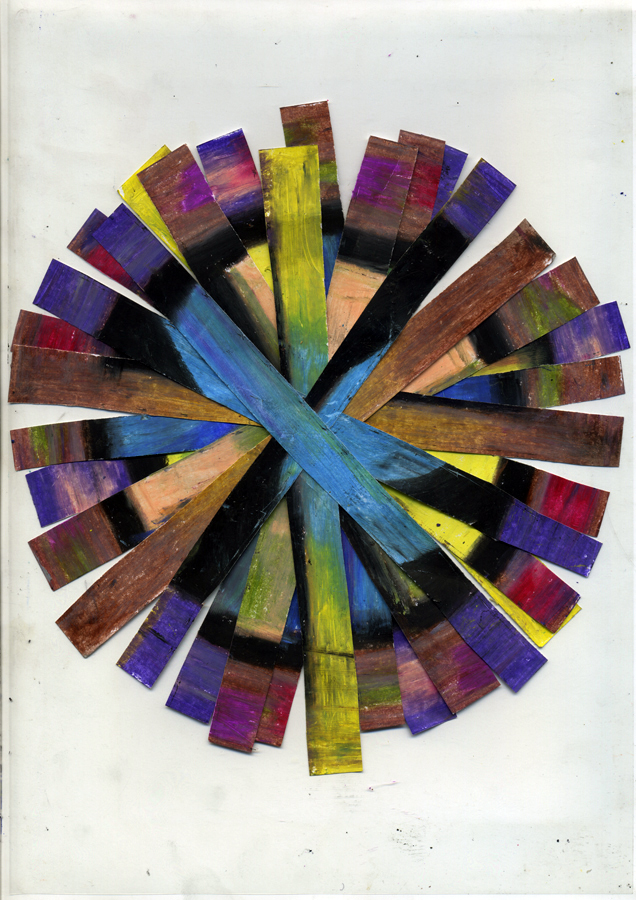
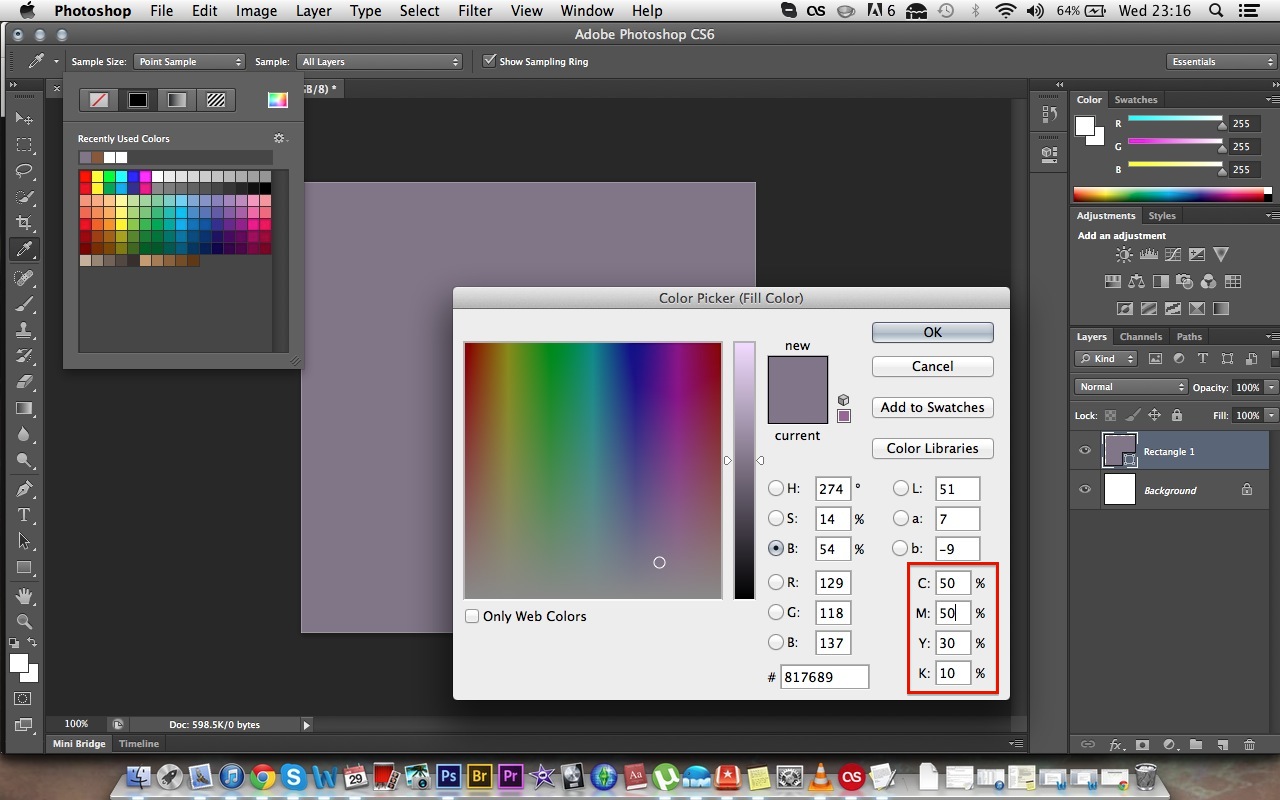
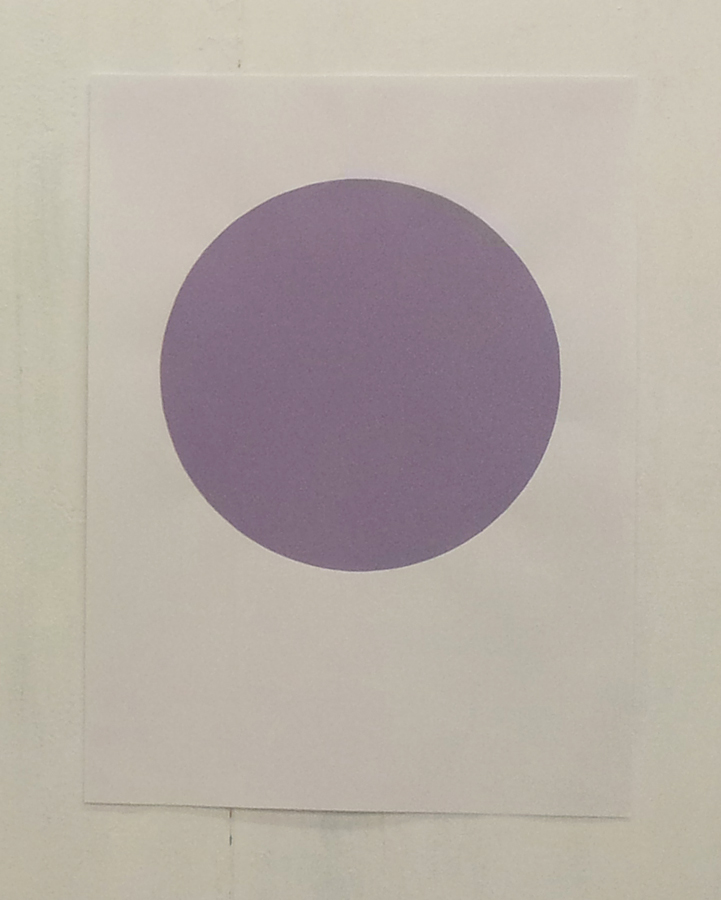
i decided that the colour i’d silkscreen would be the result of my answers to the questions the morning after i created the system. my answers were 5, 5, 3, 1 and made into percentages as shown below:


 …and “the colour of my day” beside my silk-screened circle version:

 circle_redu


//

i knew that to develop my project further i’d have to send this survey around and ask people to fill it out. therefore, i made an online survey using a survey-making-website (which can be accessed here):


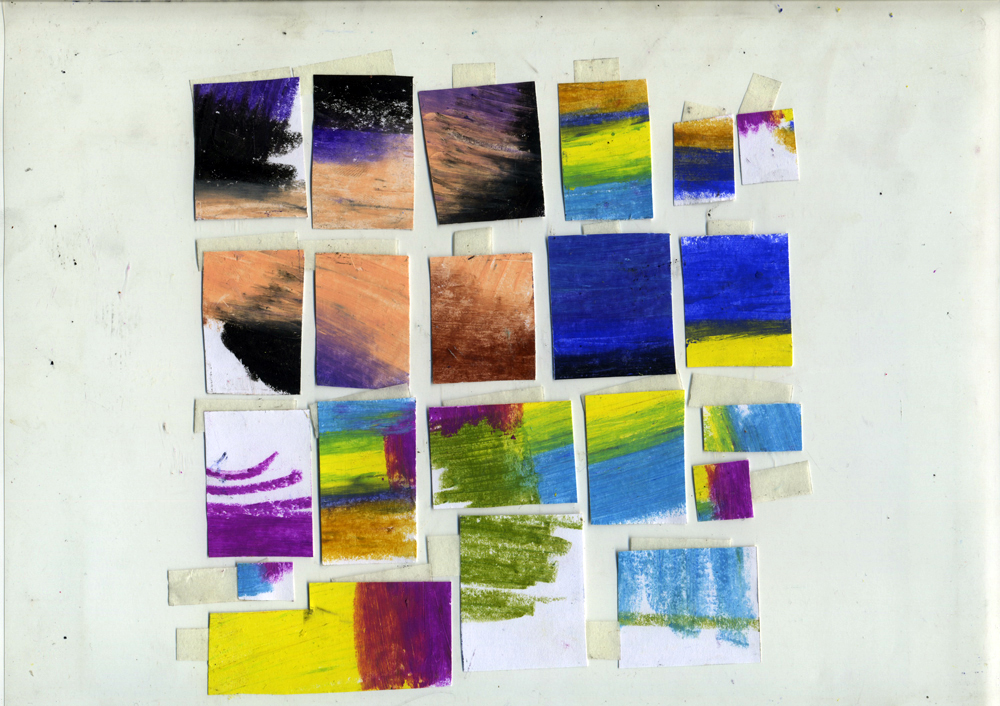
this website organized the data which i later used to determine individual colours for each of the 40 people world-wide who answered my survey on the 12th of december, 2013. i mapped out all 40 colours to illustrate the colours of one day, according to the answers of 40 people:

colour-system_redu


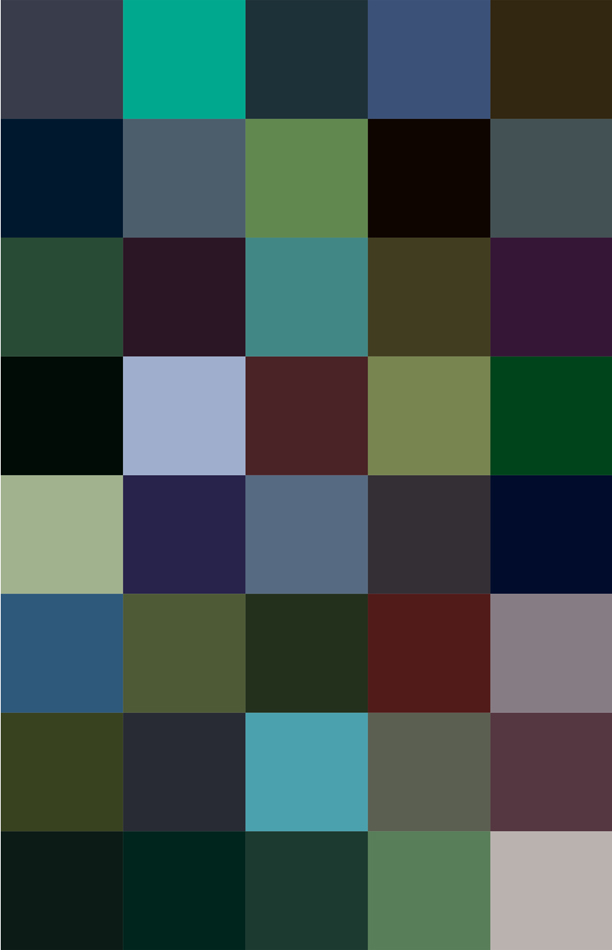
a problem i encountered on two occasions was that if 10 (being absolutely) was the answer to the last question: how similar is today to yesterday? (K), then the colour would be entirely black. since the other quotients would be cancelled out, i didn’t want this to happen. so instead, i set the percentage as 95% rather than 100%. even though both appear to be black anyway, i like the idea that there are still undertones of colour. and although it did not stay completely ‘honest’ to my original system – at the time i thought it would be a good compromise.


//

after i was done with the poster shown above, i decided to design a survey of my own (which i would put online and use if i were any good at computing):

i think through this translated colour system, i managed to play on the randomness of colour representations, but also create a functional and fun system (which also has the potential of becoming interactive).

colour-system_total_redu


A “light” summary of color


Tuesday, February 4, 2014

When we think of light and colors the first thing we think of is the RGB color model.
The RGB color model is an additive model based on red, green and blue colored lights. When added together in various ways, they can produce a wide range of colors. The name of this system comes from the initials of red, green and blue.

HueSystemRGB The RGB color system’s main purpose is to display images in electronic systems, such as televisions and computers, although it’s also been used in conventional photography.

This system is based off of the Young-Helmholtz theory of trichromatic color vision. This is a theory developed by Thomas Young and Herman Helmholtz in the early to mid 19th century.

Trichromacy is a condition in which one has 3 channels to convey color information. Humans are trichromats. Each channel has a different absorption spectra, thus showing the viewer a different color. Young came up with this theory in 1802. Herman von Helmholtz brought the theory further in 1850 by classifying each wave length under the colors blue, green and red.

James Clerk Maxwell elaborated on this by creating a color triangle in 1860. He is the founder of color photography. He proposed in 1855 to take 3 black and white photographs and run them through red, green and blue filters. Each filter was projected on a different projector, and when superimposed, the human eye percieved a colored reproduction of the scene.

2474164072_d421085ba2_z The RGB system is also used for display screens, such as televisions or computers. Each pixel on the screen is built by driving three small and very close but still seperated RGB light sources. From a normal viewing distance the seperate colors are indistinguishable tricking the eye into seeing a solid color.

Here is a silkscreen print colour-wheel_White of a single colored circle made to represent the RGB color model. I chose to print the circle white because i felt that it would be the most accurate way to represent the entire system. The reason being, as you can see on the RGB color wheel, the combination of red, green and blue lights create a white light.

An other project I did was to create a projected piece based of the RGB system. I felt it would be interesting to base myself off the color wheel to create a less scientific but more abstract version of it.

These are the initial sketches I came up with: Screen Shot 2013-12-13 at 10.51.42 AM


I ended up choosing this one sketch for my final piece. Because this is a theory purely based off light, it does not work if only on paper. I needed to find a way to implicate this color wheel to something involving light. Therefor, I decided to scan and project this color wheel to a wall. By using a projector, the piece based of light and thus appropriate for this system.

How ever, i felt this was not enough. So with Photoshop, I divided the piece into three by separating it into channels: Red, Green and Blue. This way, i could go back to the origins of this model which is based on the addition of those three colors.

Screen Shot 2013-12-13 at 10.51.20 AM Screen Shot 2013-12-13 at 10.51.57 AM Screen Shot 2013-12-13 at 10.52.09 AM

After transferring these images into jpeg’s, I placed them into the iMovie software and created a short one second film. When running this film using a Quicktime loop, I created a gif.
Finally, this gif is then projected on a wall, completing the piece :


Get the Flash Player to see this content.


Explicit variables


Tuesday, February 4, 2014

The DIN color-system.
I started learning about the DIN system and i will try to explain you about it.

When i went looking for this system on google, i didn’t find much. I had some struggles dealing with the explanations, and ofcourse they also had interesting words in it which i didn’t knew the exact meaning of.

I am going to explain to you the DIN color-system in my own words, and hopefully you will get it and than maybe you can explain it to me again.

street_art_paint_war_berlin

D deutsche I institut N für normung

The colour-system started development in 1941 on the initiative of the Deutschen Normenausschusses in Germany.

They recognised the need for a more practical color-system than the Ostwald system. The Ostwald system was used since the First World War.

By psychological experiments, they created an order in addition to a circle of 24 color-hues and a saturation scale, introduced a darkness scale as a special parameter for establishing the relative brightness of non-self-illuminating colors. (copied text)

They attempt to show equal distances in defined color series, the idea was to create a color-system operating with the explicit variables of colour-hue [x], saturation [x] and brightness. And than in the most perfect way.

The main aim is a technical application in close connection with colorimetry. (copied text)

I put in some images in the text as you see, those are the technical images of the DIN color system. The explanations of these where nowhere to find, but when you take a look at the other color systems here on the blog, you can have an idea of how it works. Because in a way they all want to show their perfect way of showing colors.

01din 02din 01mun

In the end i get what the institute wanted to create, but then if i take a look at the technical part of the system my attentions fades away. And there was not enough information (for me) to find the completely explanations.

DIN6164Colorsystem

 
As you can read in the text, you can see that the colour-hue [x], saturation [x] and brightness are important in the whole story of the DIN system. In my case I heard and I see these 3 words a lot. Especially while using Photoshop. But what do I exactly do, while using these adjustments?
In the process of learning about a color system for me it’s important that it’s fun, because learning for me is not the most fun and easiest to do. So I started thinking of a nice way to learn about hue, saturation and brightness. First I came up with making pictures of it. But how? I don’t even now exactly the difference between the 3, and how to show it in pictures?
I took my laptop and started playing with the 3 things in Photoshop. I made pictures of white objects on a black background.

HUE

hue

SATURATION

saturation

BRIGHTNESS

brightnes


After I made these adjustments on the picture I thought of a way to present it. Immediately I thought of a flip-book. And this is what I did.


IMG_1405_reduIMG_1407_reduIMG_1409_redu

Get the Flash Player to see this content.


Well now I know the basic importance of the DIN system, and I think also a lot of other color systems haha.
If I had to show the system in one colour? …The most purest and perfect RED.

IMG_1438_redu


Freaking contrast


Monday, February 3, 2014

Some time ago I heart about color theories. My focus was mostly on the color theory of Ewald Hering. He was a psychologist. As a psychologist, he was busy with the perception of color by people. He made a theory based on another theory. The theory of Helmholtz and Young. Young and Helmholtz said that there are three primary colors (red, green and blue) these are the basis for every color. But Ewald Hering made his own improved version of this theory of Young and Helmholtz.

               Ewald_Hering2   hering1

Ewalds color theory is about how color is perceived in the eye. The perception of color is (re)made in the brain. In the eye there is a layer which is sensitive for color, it is called the retina.

You have little cones in this layer of your eye. Every cone has its own function in relation to color. Each cone is sensitive to two colors. The cone has two colors that are opponents of each other. Red and green are together in a cone. As well as blue and yellow and as black and white. When a cone is being activated by for example red, green also reacts to that cone. In the cone there are nerves which pick up the signals of the colors and transport that to the brain.

eye


The introduction of the color yellow into the theory was very important. Hering said yellow was a primary color. We see yellow as a primary color in painting but in light it was new to use yellow as a primary color in color theory. Like in the theory of Helmholtz and Young, there yellow was said to be a mix of green en red.

The color is what makes Herings theory innovative for the time. He changed from three primary colors to four primary colors.

 Yellow

With his fourth primary color, the way the colors responded to each other had to be different. He made a theory for that which deals with opponent colors. Because the sensation of green and red together cannot be seen together in one color. (Reddish-green doesn’t exist). But his theory claims that they do have to interact with each other.

Get the Flash Player to see this content.

I thought it was fascinating that someone could create a theory by thinking in a logical way. Because Ewald could not proof that Helmholtz and Young were wrong with their theory. He based his whole theory on the fact that he experienced that people could not see yellow as a mix of green and red.

colors

What I then tried was combining red and green light through 3D glasses. I thought I saw yellow but when I looked again, I just saw black. That might also have been caused by the method of using filters. When you put a red filter and then nothing else red goes through, if you then put a green filter it will go black.

I find Herings way of making a color theory a beautiful way of finding new things.

”Farbenkugel ”


Monday, February 3, 2014

Schermata 2014-02-06 a 22.57.12

Colors //

Philipp Otto Runge, born the 23 july 1777, died the 2 December 1810, he was a German Romantic Painter, friend of Goethe (that wrote a ”brick” book about colors; ”Theory of Colours”) in short, they shared the same interests. Runge dedicate his life on accurate, almost ”scientific”, drawings, painting and he dedicate him self on the studies of colours and creating a colours system.

For him there are three colors (blue, yellow and red) what he wanted to do is create the complete kind of colors resulting from the mixing of them, among them self and black and white. The result is a  sphere illustration similar to planet earth with two poles of black and white and colors are mixing each others in all direction and depth. The easy way to visualize his idea I think is to imagine it as a three-dimensional sphere that you can as well dissect (like an apple) and inside discover colors mixing among each other.

527px-Runge_Farbenkugel

What I appreciate on the ”Farbenkugel” is his ambition on creating a complete illustration of the relation between colors, and the obvious benefit that you can have from it.

With the fact that he is a painter you can see that his colour studies influenced the way he is handling colours (x;x) in his paintings that make me interested on choosing some of his paintings, simplify them and select some colours with the use of pastels, than be playful and let the process lead me to create something.

illustrazione-copy Philipp_Otto_Runge_005


The process//

First of all I selected some of his paintings and then I made some abstractions based on the similar color that you can see in his works, then I cut out parts, square and lines of the abstractions. Build forms and experiment and play around with them.

An interesting point of the “Farbenkugel”, if I´m not wrong, is that in the center of the sphere, or rather the core, all the colors are mixed and give black, I decide to pick a gray because of adding some white from the upper pole of the color sphere:

1903285_10151905931406314_1697678139_n

Actually, the more I was experimenting and trying out, the more I was getting insecure and confused.
Finally I decided to focus on the square selection and zoom/ abstraction of his painting.

Prova2-15_redu A2pastel

Prova2-9_reduprovaA2_redu

So I selected some of the more or less 5 x 6 cm cut outs, scanned them and printed them in A3. But then I still didn’t know what to do with them.

I questioned myself what should I do? So i pick up the camera and start filming but….

I was getting more lost and far from the original idea.

Whit this color system I must say that I learned to not underestimate or doubt the first idea, but go for it and finish it.
So this is a video clip showing the concept of extraction of colors on the first idea that I had, and if I followed correctly maybe I had some more image exemples…

Get the Flash Player to see this content.


Log in
subscribe